
A quilt is a work of art, so don’t forget to sign it! If you’ve ever wondered how to make a quilt label, today’s guide is here to help you out! We’re sharing a FREE Quilt Label Template and tutorial for making a simple handwritten quilt label.
What to Write on a Quilt Label
The most important information to write on your label is the name of the quilt maker. What goes on your quilt label is up to you, but if you plan to enter your quilt into a quilt show, there may be specific requirements for the type of information to include and where to attach the label. In general, some information you might want to add to your quilt label is:
- Quilt maker’s name
- Quilter’s name (if different from the person who pieced the quilt)
- Date completed
- Location where the quilt was made
- Name of the quilt or pattern
- Quilt recipient and/or occasion for the quilt
- A personal message
- Your contact information
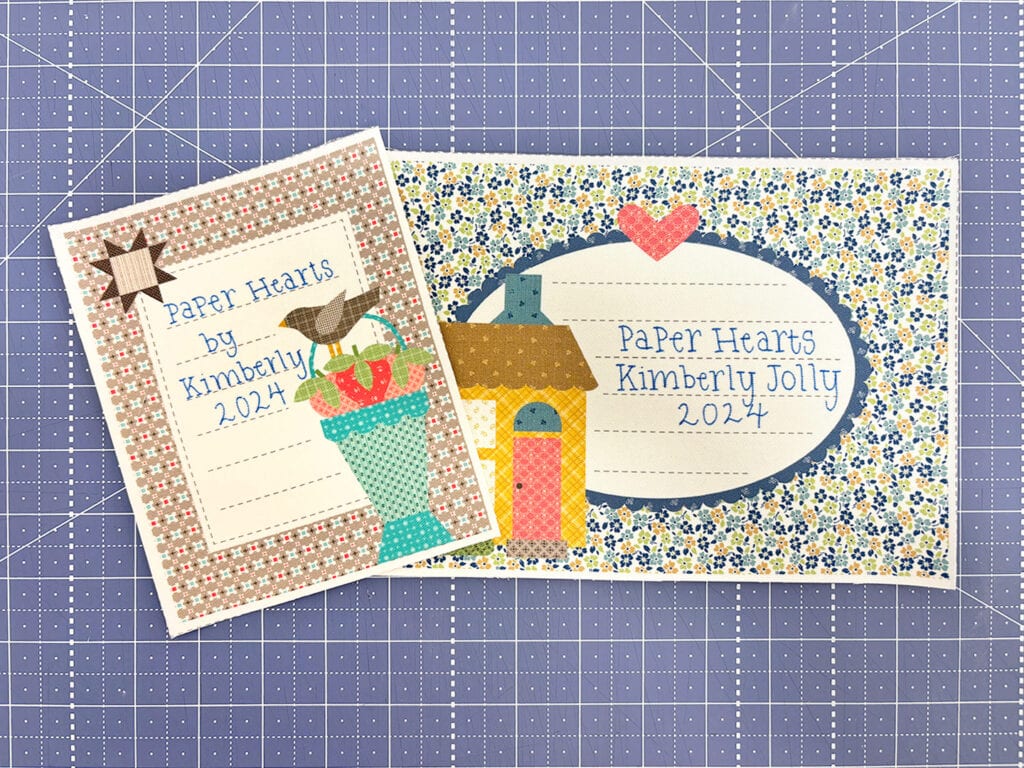
- Cute doodles (hearts, flowers, vines)
How to Make a Quilt Label
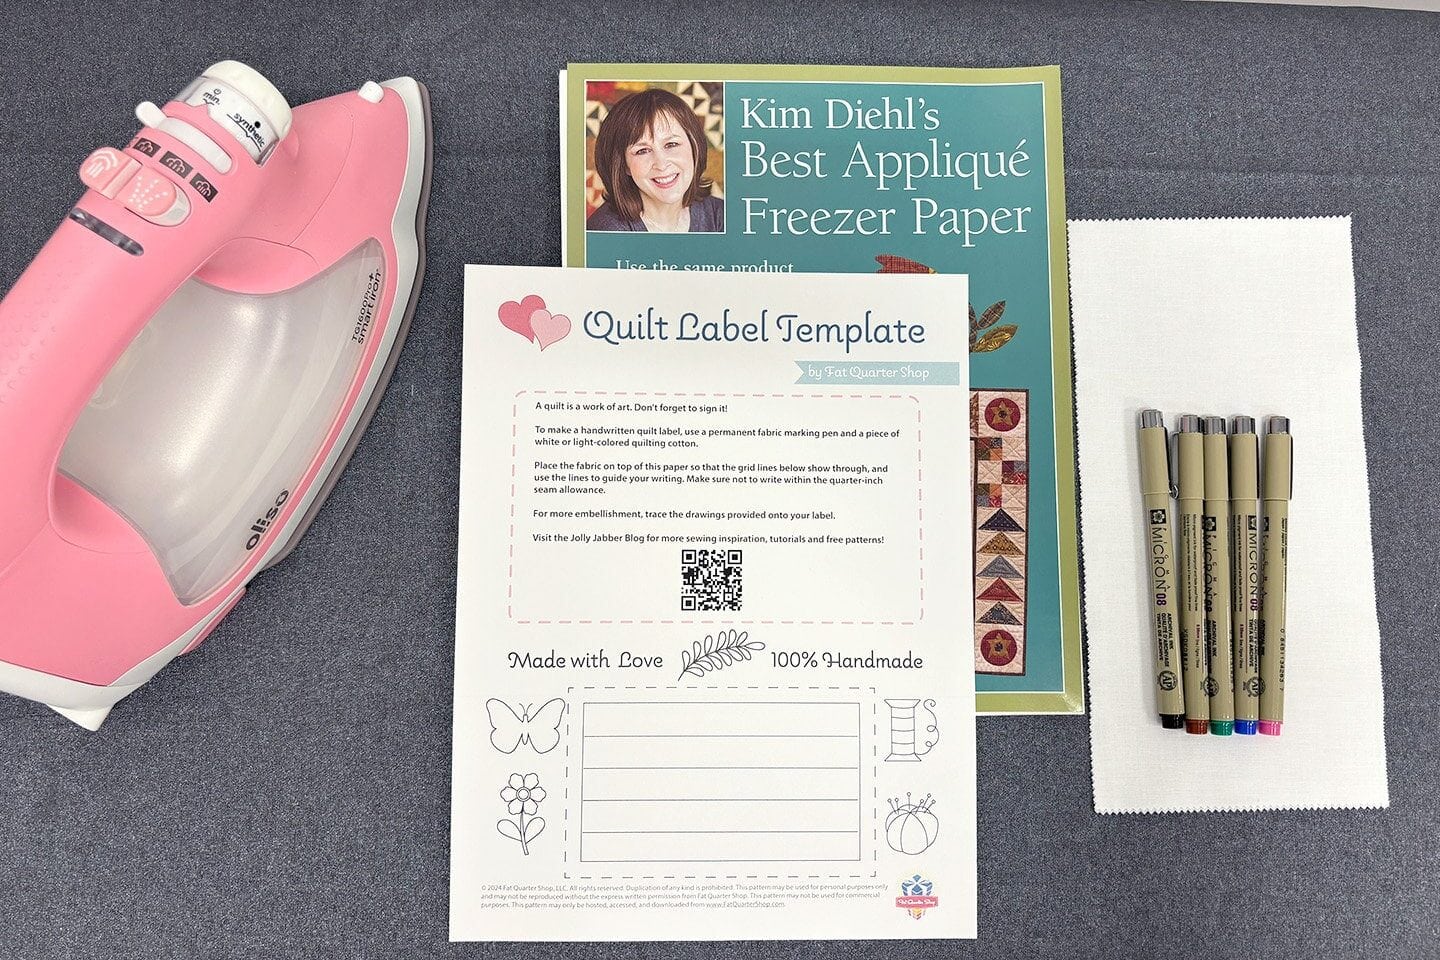
Quilt Label Supplies
To make a quilt label, gather a few supplies:
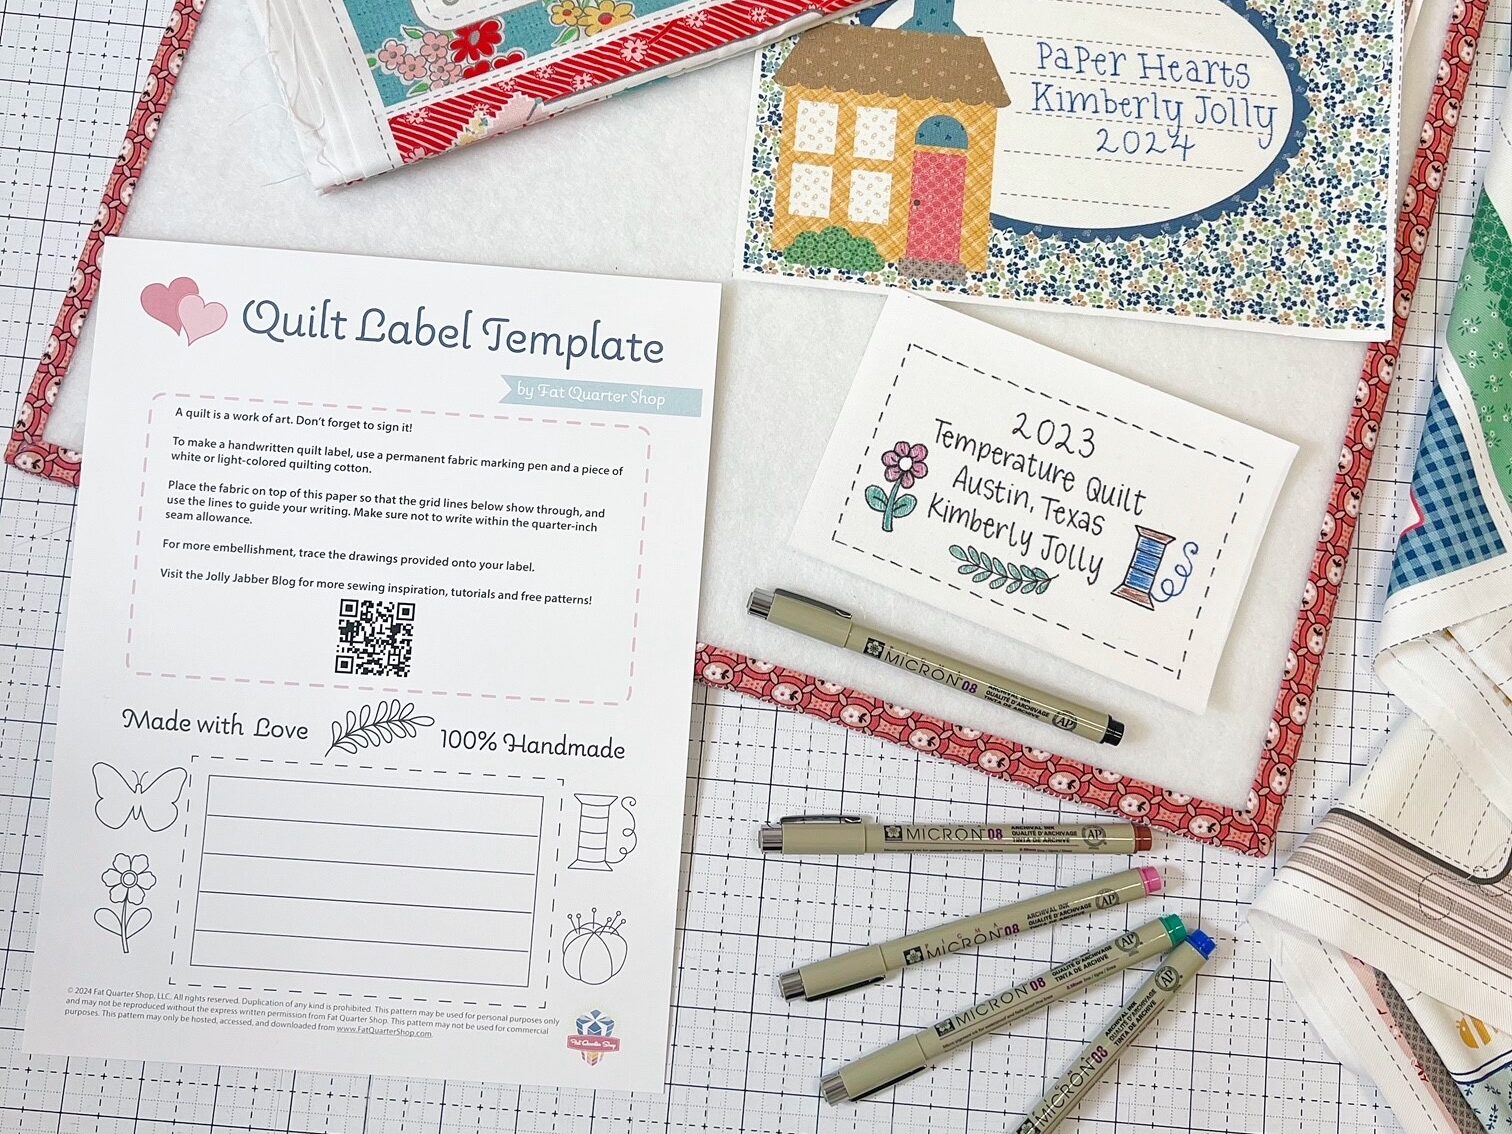
- FREE Downloadable Quilt Label Template
- Permanent marker (we’re using Pigma pens by Sakura, but a fine-tipped permanent marker also works)
- 4″ X 6″ piece of white or light-colored quilting cotton
- 3.5″ x 5.5″ piece of freezer paper (We’re using Kim Diehl’s Best Applique Freezer Paper, but you can also use freezer paper from the grocery store.)
- Iron and ironing board
Stabilize the Fabric with Freezer Paper
Bonding the fabric to the freezer paper makes the fabric much easier to write on. Freezer paper is handy to have in the sewing room for making applique templates, foundation paper piecing, and for making printed or handwritten labels. You can find freezer paper at the grocery store, but don’t confuse it with wax paper or it will be sad day in the sewing room!
The shiny side of the freezer paper has a light waxy coating that adheres to the fabric, but is completely removable in the most perfect way. Cut out a piece of freezer paper that’s a tad smaller than the piece of fabric for your label to keep any waxy substance off your iron.
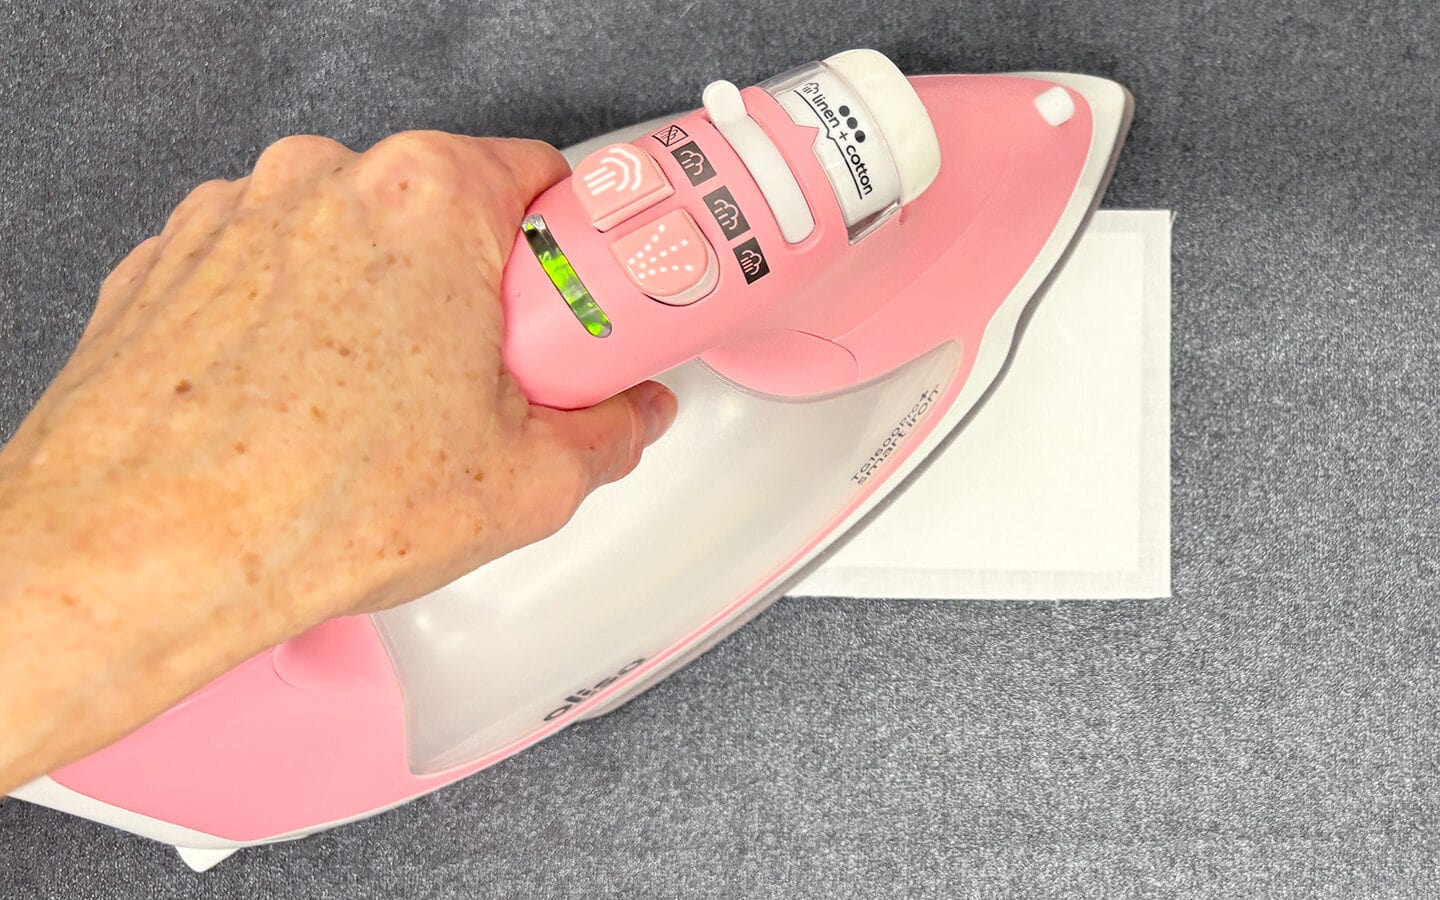
With a high-heat, no steam iron, press the shiny side of the freezer paper to the back of the fabric for about 10 seconds. Allow to cool completely before you test if the fabric has adhered to the freezer paper. If it hasn’t, give it a little more time under the iron.
Write on Your Label
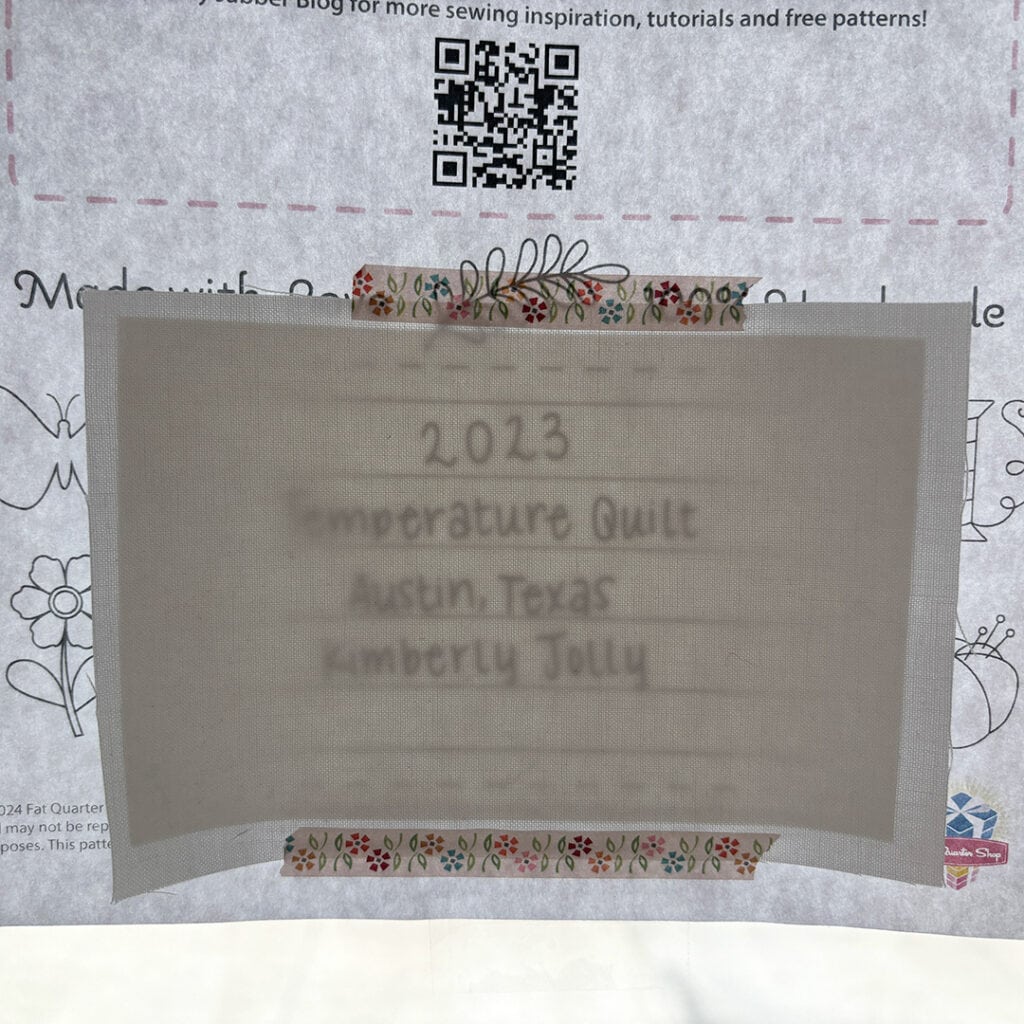
Write out your message on the Quilt Label Template to plan out your writing. The guidelines are there to help keep your writing neat and centered on the label. Keep your writing at least a quarter-inch away from the edge of the fabric so that it doesn’t get sewn into the seam allowance later on.
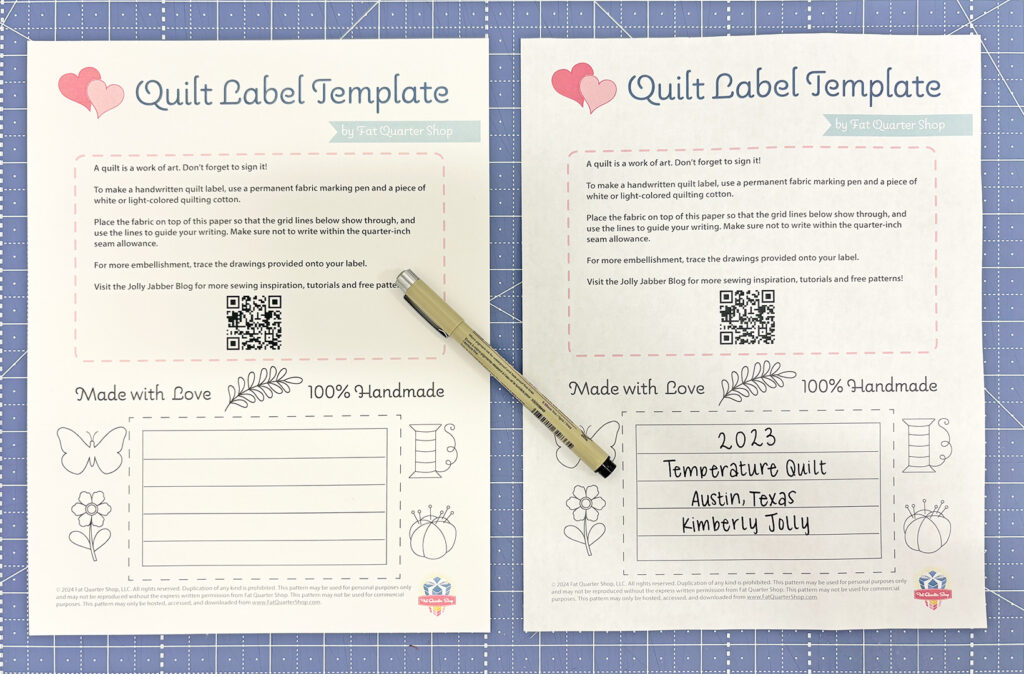
Next, tape the fabric/freezer paper unit to the Quilt Label Template, centering it over the rectangle. Place the paper on a window, lamp, or light box, and you’ll be able to see the guide lines through the fabric.
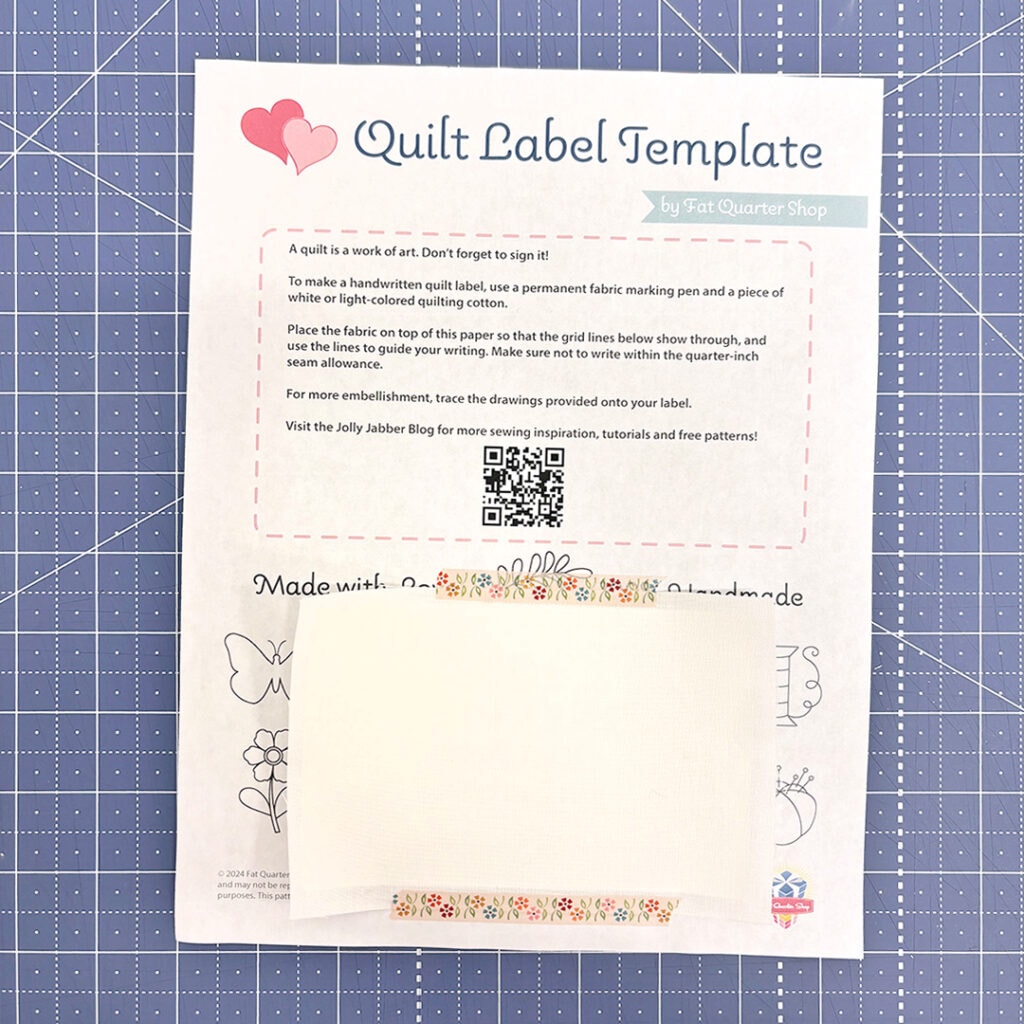
We included cute doodles on the template that you can work into your label, too!
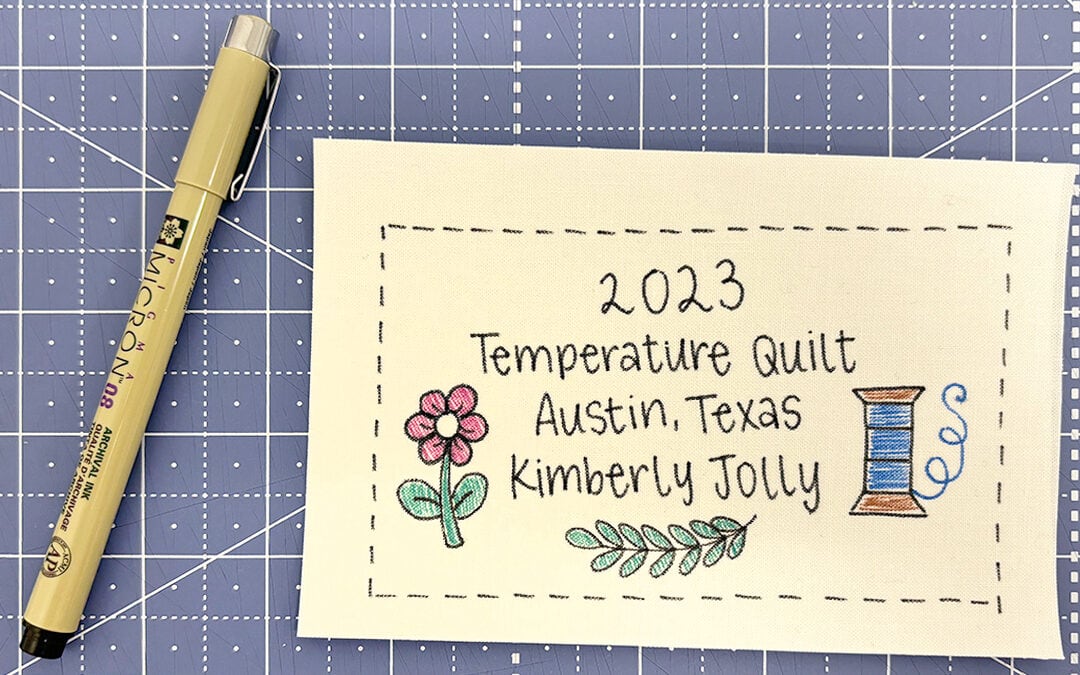
After you’re done writing, you can peel off the freezer paper. It comes off easily and won’t leave a residue on the fabric.
Adding a Label to Your Quilt
Now that your label is ready, you can follow along with this free video tutorial where Kimberly Jolly shows you step-by-step how to add a quilt label to a quilt back. And in this video, Barb of Me & My Sister Designs shows How to Attach a Quilt Label to a quilt that has already been quilted and bound. For more tips, check out this blog post on how to sew your quilt label onto your quilt.
When your quilt is gifted, passed down through the generations, or travels to a quilt show, it’s nice to know who made it.
For more tips on labeling quilts, visit this blog post. For more tips for writing on fabric, check out this signature quilt tutorial.
Giveaway
What’s your favorite way to label your quilts? Let us know in the comments below for a chance to win a set of Pigma Micron Pens. We’ll pick one winner at random on Sunday, May 26, 2024. I’ll update this post and notify the winner by email. Good luck!
UPDATE 5/28: Thank you everyone for visiting our blog and leaving a comment! Chosen at random, Becky is our winner! I’ve emailed her to notify her.
Share with FQS
If you’re inspired to create unique labels, share them with us on Facebook and Instagram, be sure to tag @fatquartershop.
Stay connected to Fat Quarter Shop!


211 comments
I have been using Sweetwater labels, but now I know how to make my own, especially if I want more information on the label. Thank you for the information and the tutorial.
I like to use preprinted labels with my name.
I use Sweetwater labels and if I want to put extra information, I use either muslin cloth or matching background fabric to write on. I’ve never used the freezer paper method but will try on next quilt:). Thanks for the information about pens, I use a permanent marker now but I don’t like how the writing looks. So I will try the ones listed here.
I do a square of fabric around 6” square folded diagonal then sew to bottom right corner when I sew on binding That way when the binding is done the quilt is done!!
I use this method with a fine tip sharply. I must try this Pigma pen
I pretty much make my labels the same way, sometimes incorporating a leftover block when appropriate. There are lots of sewing themed embroidery patterns available to trace whatnots, too. I key my quilt tell me what it wants!
I have been using machine embroidered labels, but you have inspired me to create my own hand-written labels. Thank you!
I picked up a pre-printed label panel at my local quilt store. First time using them. I love them. Plan to label my quilts.
The only way I’ve ever made quilt labels is with machine lettering, but they don’t always turn out so perfectly. I can’t wait to try this method.
I’ve been having my husband, who does machine embroidery – make the labels for me which I then sew on. I have not been putting where the quilts were made, which I should add.
I use the freezer paper on back of my fabric and then run it through my ink jet printer and set it with a hot iron before sewing it onto the back of the quilt. I had a friend teach me this method years ago.
This will now be my favorite way since I have yet to actually finish an entire quilt yet 😉
I make a triangle and put my information on it with pigma pens then Iron it to set the ink. Sometimes I embroider the information and then quilt making sure I catch the label in the quilting.
I have recently used a 6 inch square. I press it in half on the diagonal and use freezer paper on one half to stabilize the fabric. I write my information on the one half with freezer paper. I place the label in the right bottom corner of the quilt back and sew it in with the seam for my binding. You can hand stitch or machine stitch that diagonal down if desired.
Thank you once again for your generous “freebies” and the tutorial. I like to make my own labels using the freezer papermethod so I can adjust the size to my needs.
I use a similar method, using the pen you mentioned. Sometimes I hand embroider my name. I really like the Lori holt labels that come on a panel.
I’ve made labels on the computer before and printed them out, but it’s sometimes frustrating using the computer programs if I don’t do it often enough. My favorite way at the moment is using the alphabet letters on my Janome to make the labels but I’m not super accurate on getting things lined up. I’d LOVE to have the micron pens to label with my own handwriting!
I had made/purchased a die that is in the shape of my home state of Montana . Then it is embroidered with my personal information, iron down then hand stitch onto the quilt.
A super newbie, have not had the pleasure of labeling one, truly appreciate the help! Thank you
Hi, I use muslin scraps that I fold and iron into a triangle shape and tuck into the corner of the quilt and secure with my binding stitches. I usually use a permanent marker to inscribe it but the pens would be a welcome addition.
Thank you for the tutorial. I’ve never put a label on a quilt, but maybe I’ll give this a try. Thanks for offering the giveaway.
I’m afraid I have not put labels on my quilts but certainly will give this a try!
I usually machine embroider my name and year on the binding, but I think I will use this idea from now on.
I hand write on muslin hand sew on
I have always used my embroidery machine to create a label—used many different styles. But I’m definitely going to try this method as I believe it will be much quicker and easier. Thanks for sharing and for the template!
I love this idea! I haven’t labeled my quilts so far but I definitely need to start. Thanks for the tips and tricks.
I primarily use Word to create a label, usually adding a picture or frame, then print it on fabric paper on my ink jet printer. It works fairly well unless the printer misbehaves, which is often.y hand writing is horrible so I gave up trying to write myself. I’m anxious to try this new method!
I create my own labels depending on the quilt I am making. I might use an extra block, my embroidery machine, cross-stitch a label with a fabric border, use premade labels or prepare it how FQS describes it on this blog post.
I try and make each label unique to every quilt I make.
I love to use appliqué paper…practicing before I adhere to fabric.. use my best hand writing..copy/trace..cut out and appliqué on quilt back..
I usually design and make a cross stitch label. Takes more time, but they have been well received.
I have used machine embroidered labels, but am ready to try an easier method.
Right now I am using some small labels I had printed. However, I was embroidering labels and sewing them in. I love these ideas!
Hi Becky! I love embroidered labels, too. Also, you’re our lucky winner on this giveaway! Thanks for visiting our blog and commenting. I’ll reach out to you by email to arrange delivery. 🙂
I’ve made machine embroidered beds using the left binding and then stitched it in when sewing down the binding. I may switch to using the pigma markers.
I usually embroidery my quilt labels. I add my name, date, and location.
Thank you for the free label template as well as the great tips and video concerning quilt labels!
I’ve been using hand embroidered and machine embroidered labels but really like the idea of handwritten labels🥰; looking forward to using this technique.
I used to use the letters on my 9450 to do my labels, but after I purchased an embroidery machine, I like to use it to make my quilt labels. They look a little more finished that way. However, I may try the way shown on the FQS blog just to try something different. Thank you!
I have generally used my embroidery machine to do labels and have also used Sweetwater labels. This looks like a great way to better personalize my quilts. Thanks for always offering us so many great ideas!
I’m always in a hurry to finish, I always add a label later! Starting now, I will aim to make a quilt label when I make the binding, excited to use your method for labels. Thank you for step by step tutorial!
Love your idea and method to make a quilt label using Sakura permanent pens which I would like to try.
Have made many quilts but have never put a lable on as yet. Thanks for the tutorial. 👍 I would like to try. Cheers.
I always hand write my labels with permanent marker directly onto the backing fabric. Thanks for the label template, I will give that a try.
I love the Sweetwater labels and I’ve recently began making my own similar labels. I buy panels of labels and use Hot Fix iron-on adhesive. Love micron pens!
I created a label with a photo and have it printed on yardage from Spoonflower. The only thing I have to add to it is the date completed.
I’ve been creating my own machine embroidered labels but this looks so cute and more personalized
I also fold a square diagonally and sew it in the carner when binding the quilt, but I also have woven label with my name and the words ‘hugs are sewn in’, as I donate a lot of my quilts to Project Linus. I just sew that right on the triangle, along with the Linus label.
I have been making my labels using cross stitch, but this would be much quicker! I try to include who I made the quilt for, and since they are often for grandchildren, I will say “by his Mimi”, but then include my name.
I usually use a plain fabric that coordinates with the quilt and either freezer paper on the back of the label and then print the message from the computer. I also make some with my embroidery machine and/or just hand written. I include who pieced & quilted the item and the date it was finished.
Love this post! I like to use a variety of ways to label quilts. Including Sweet Water label club, machine embroidery, and now marker pens!!
I use a triangle piece of fabric and machine sew into a corner. That way I only have to hand sew one edge.
Favorite way to label quilts is to print out using inkjet printer using color and/or black ink only. Like placing label diagonally into lower right corner when binding quilt.
Great blog post. I am going to try this. I like how I can add all the info I want to include.
I use the website stitchpoint.com to create a message that I stitch onto cross-stitch fabric. I use am embroidery floss that coordinates with the quilt fabric. I turn u der the raw edges and sew 2 edges into the binding & blind stitch the other 2 edges. These labels have become my “trademarm”!!
I like to print it on the computer and sew it into the corner when I attach the binding.
I’ve been using a panel of printed labels with different colors and motifs on them. I pick a label that corresponds to my quilt and, using a Micron pen, fill in the details.
I have the SweetwaterQuilt Label subscription, so I normally use those. I would really like to learn how to use my embroidery machine so I could use that to make labels, but this is a really cute idea & included your personal hand writing! Thanks!
I have been using a panel of preprinted labels and have also used Sweetwater labels.
I use Sweetwater labels and Pigma Micron pens to add to the label.
I loved reading how to do the tutorial and how others label their quilts. I use my machine to embroider the city and state and year I made the quilt and then attach a personalized purchased label on the back!
I always use personalized quilt labels from Sweetwater and Everemblem but now I’m inspired to create my own! Thank you!!
I’ve been hand embroidering labels but I’ll have to try this!
I’ve been labeling my quilts from the start (advice courtesy from my MIL). Initially I used machine embroidery, then hand wrote them, but now I use PowerPoint to create the label and then print them on printable fabric. They also gotten a lot more elaborate with fancy lettering (I’m addicted to adding fonts to my computer), pictures/clip art, multiple colors, but all of the pertinent information is still included.
I like to include my name, location and date. If it’s a gift for a special occasion, I may include a saying or poem. Thanks for the chance to win the pigma pens!
I have never used a label before. This looks very easy to try. Thank you so much for the template and tutorial!
I usually label my quilts, if I remember! When I don’t I go back and use a little white fabric with the date, maker and a message of love!
I haven’t been labeling my quilts. So thanks for this template now I can put a signature on my quilts.
Sweetwater labels is what I have been using. I put a frame around the label to give it a finishing touch.
I am not very consistent at labeling my quilts. I pretty much only do it if the quilt is entered in a show. I think I’m going to purchase Lori Holtz panel so I can get better at it.
I am bad about labels…I have used preprinted a time or two.
I am bad about making labels but when I do make a label and turn it into a pocket that has fabric pieces that was used to make a quilt. This is for any small holes that may develop.
I also like to add if I worked on the quilt in a class or on a retreat. If some of the fabric or blocks came from someone else, I like to mention that also.
This is very interesting as I am new to quilting and look forward to trying a new method. I have a small embroidery machine that I use to make quilt labels now. Thank you for the tutorial.
I cut a large square from a light-colored fabric used in the quilt top, fold it in half diagonally to make a triangle and align with the bottom right corner of the quilt back (raw sides of triangle label to raw sides of the quilt back), and sew all around the triangle label with 1/8 – 1/4″ seam allowance — usually before sandwiching the quilt, but most often right before binding the quilt. I write all of the things that FQS has suggested so the quilt is well documented (when someone finds it at a thrift shop and takes it to the Antique Road Show 100 years from now)!
On smaller quilt projects that require less information, such as a small table topper, etc., sometimes I will sew a tab style label right into the binding.
I don’t make my labels. I bought some
pre-made ones at a craft bazar many years back. The only writing on them is “made in the USA”.
I guess I should start making my own now, since I now know how to do it, and to make sure that I add the pertinent information on it.
Thanks Kimberly, for this information, template, and tutorial.
I use a square of fabric for the label, fold it in half and write my information. Then place it on the corner of my quilt and sew it down with the binding and then sew the remaining side on by hand.
I have customized my labels, using a light fabric for an area to write the message on and then border that with fabric scraps from the quilt, sometimes adding a fussy cut motif to have fused and appliqued in a corner. I also love Lori Holt’s labels!
I’ll try this without the light box since I don’t have one. the Pigma pens are great and you can get them in black or colors. I will use Lori Holt’s applique method to eliminate unfinished edges. Thanks for this guide and template.
I either make a handwriten label (my favorite is a folded triangle in the corner) or write directly on the back of the quilt.
I’ve hand-embroidered, written on backing with permanent marker, used iron-n labels. But, my favorite way is to use my embroidery machine to either make a label to sew on later (if backing is dark or strongly printed) or directly on the backing before basting the sandwich.
After reading this blog, Irea6liza that I need to add more information to the quilt labels that I have been using. The template and pen will leave a more personal touch t6 the “labor of love” that is created and completed!
I’ve created a couple of different labels using my embroidery machine and stitch the information on a 6″ square. This gives me plenty of room to add what I need and then cut it down to a smaller size. I sew light weight interfacing and turn it inside out before stitching on the back of the quilt.
I normally take a piece of white fabric aound 4.5″ square, fold it in half and write the quilt name, pattern name and my name on it. Plus the date. Then I attach it together with the binding.
I have yet to try micron colors or freezer paper. I usually make my own using a light box to trace onto the fabric with a black micron pen a design I find that is simple to trace or I machine embroider a design onto fabric. Then I add it to the back of the quilt as I am attaching the binding to the quilt. Time to get my creative ideas into motion. Thank you for the tips, ideas and helpful means to do so.
I’ve been using sweetwater labels but definitely want to give this method a try. Thank you for sharing.
I like using pre-printed fabric labels but really want to try Sweet Water labels.
Just finished my first made by my hand quilt label using the template and a Micron pen. I have previously paid to have my labels made, if I add one. I’m very bad at labeling my quilts. Thanks for this blog and wonderful instruction, I now have the confidence to make my own!
I use the ink-jet printer method. I love it; just hope that old printer hangs on for a while! 🙂
I always say my writing is so bad I should have been a doctor! My Pfaff sewing machine has several alphabet fonts and allows me to adjust the size somewhat so I program what I want on my label into the machine and sew it onto my label. I do use a Micron pen for smaller labels.
I like to embroider my labels & if the quilt is large enough I like to make it circular & embellish. Thank you for the stitch Witchery video showing the hot hemmer tool!
Sometimes I ask my Mother to embroider one with her sewing machine but mostly I just make one myself using the micron pens. I do have some preprinted Lori Holt labels that I like to use on quilts made with her fabrics. Thank you for another resource FQS!!!
I have purchase some printed “quilted by” labels. This is a much more personal touch. Thank you
I try to always make sure there is a label on every quilt and don’t have one set way I do it. I have purchased a Lori Holt label panel and sometimes use those. I have also just cut a square of muslin and sewn to the backing. And, the other way I have made labels is to use a leftover/extra quilt block, or one made from leftover scraps from the quilt top, and write the info in white spaces. I generally use a fine point Sharpie marker (but would love to have the Pigma Micron Pens to use!), and I always put a spot for the long arm machine quilter to sign her name herself. I have digitally designed some labels for vintage quilts handed down to us with a photo and information of the maker and had it printed on quilting fabric. I love having quilts labeled and find that when gifted the recipients love the label on there also.
I had a booklet of iron on labels they were fun designs. I need to finish more quilts!
Good info! Thx.
I have used all kinds of methods for my quilt labels and I always use the PigmaPens.
I usually use the Sweetwater labels then add the date I completed the quilt. If the quilt is a gift I print a text(only) label with more information about the person that quilt was made for and print it on printable fabric sheets.
I’ve been getting Sweetwater labels for several months but have only used one. I followed a tutorial by Kimberly. It came out well. I just have to remember to add it on before quilting.
I also have a lined template to keep my lettering straight. I alternate fonts to highlight receiver of quilt, and sometimes add doodles that mimic the quilt. Each label is different and colorful. They are sewn to a bottom corner to lock in the label under the binding and slip stitched on the other edges.
I like to make a block with a light centre to write the info on.
My favorite way to label a quilt is with the iron on book we received in a Sew Sampler box.
I like to use an extra block from the front to turn into a label for the back, and then write the information on that block!
I have a panel of quilt labels and a book with iron on labels. When I remember to label my quilt, I usually use one of these two methods.
I use EverEmblem labels on every quilt with just my name. But I love this tutorial on a more personal label.
I create my labels similar to how you explained above, once I remove the label from the freezer paper I then sew a lightweight interfacing on the label (adhesive side of interfacing to right side of label), cut a small X in the interfacing and turn it inside out. Finger press the edges and then use the iron to adhere the label to the quilt – makes hand stitching it down easier and it doesn’t move on you!
I fold a 7″ square in half diagonally. Then I use my sewing machine to add details to the label. Then it is sewed into the binding on the back of the quilt. I sew down the last edge.
I usually use fabric sheets made for my printer. I’ll pick a nice handwriting font and type the information I want to include on the label. I first print the info on paper first to make sure it’s like I want it. Hand sew it to the back lower right corner.
I have tried a couple of ways to make and attach a label to my projects. My current favorite is a square of a low volume print from the collection I used for the quilt. I then fold it on the diagonal, and sew it into a corner. I’ve streamlined the information to my name and the year. I am a newish quilter and have been faithful to keeping details of my quilts in my quilting journal. It’s the Fat Quarter Shop one Kimberly uses. Like Kimberly I don’t always remember and can then look back.
I use the micron pens and a ligbtbox but haven’t used freezer paper for stabilization. Anxious to try that method. I, also use a dryer sheet and Sew it to the front of label around all 4 sides then make a slit in the middle of sheet and turn right side out. It makes the edges smooth and easy to hand sew to back of quilt.
I have never put a label on my quilts. I have signed and dated them by quilting, my name and the date it was finished into the back of the quilt. I’m going to start using these labels as I can put more information on the quilt. Thank you for this great tool!
I use to use my embroidery machine to make quilt labels until my machine broke. I would love to try doing my own writing on a label.
I usually use labels from a fabric panel and write the information with a pigma pen.
I have used a number of the methods mentioned already, A triangle sewn in the corner, a made or bought label, but I always use a Pigma pen to write them. Sometimes if the quilt design allows it, I will write on a block down near the bottom of the quilt as well.
I make a triangle and put my information on it with pigma pens then Iron it to set the ink. Then I sew two sides into the binding.
i write the information usually just the month and year with my long arm If I know who I’m giving the quilt to I’ll write their name. I am writing with the sewing machine so the information becomes part of the quilting.
I make labels similar to clothing. They are not more than a 1/2 tall and run along and stitched into the binding, sometimes I make them two sided or single and hand stitch the edge to the quilt backing. I use my sewing machine to make the letters and numbers that make up the label and use plain fabric or thick ribbon folded so the wording is on one side or both…i.e: For your New Home Mr and Mrs X…love Grandma ❤️ 2024.
I am new to quilting and never labeled my quilts until recently. I also made labels for the few quilts I made without labels. I use fabric printer paper and design a label on my computer. I picked up a tip online to make a full sheet of different labels, so you don’t waste the expensive fabric printer paper. Once printed and set, following the instructions on the package, I sew my label right sides together so there are no raw edges. I then stitch on to my quilt. It is pretty easy, and I feel good to have my masterpieces labeled.
Hi y’all! I love the Sweetwater labels and use them alot. I have also made my own & have printed pictures on labels using an ink jet printer & it looks good. I think labels are very important and should be decorative too. Thanks 😊
I create labels on the computer then print them on printable fabric paper. Add a fabric border and hand sew to bottom of quilt.
I use your freezer paper and light box method, and I type the wording I want to use on my computer. Then I trace the words with a pigma pen.
Thanks for the opportunity to win a set of pens!
I have always wanted to make a label but never knew how! Thank you so much for this tutorial!
I just made my first quilt and wasn’t sure how to go about labeling it. I thought I would need to have custom labels printed. I like the custom labels a lot, but I really love how this is a handwritten label. I’m so glad it’s not too late to do this on my finished quilt. Thank you!
I like to use pre-printed labels from different Etsy shops. I usually sew into the binding.
I make my own labels and use a fine point permanent marker to write on them.
I make two labels for my quilts. I embroider a To: From: label with a Date of creation. I make it triangular and stitch it into a corner of the quilt. The second label is rectangular – Created by:, Name of Quilt, and Date created. I also add a personalized whimsical flourish on the label, or the quilt as an added “Easter egg”, type of scavenger hunt on the quilt. Find the hidden symbol on the quilt. It can be an I love you, a heart, a flower, pumpkin, star, anything that goes with the theme of the quilt.
I make my label on my computer first, using a font I like. I print out the label onto printer paper and tape it to my light table. I take muslin and cover the printer paper and tape the muslin on top of it. I trace the lettering onto the muslin with a pigma pen and then I take 1.5 inch strips of fabric that matches the backing and stitch them around the label. I stitch 2 side of the label into the binding of the quilt and the other two sides I hand stitch into the quilt turning over the edge by 1/4 inch.
I make simple labels on sewing machinewith made by me, washing instructions & sentiments for people I know. Labels for donation have washing instructions.
This home method is great! I’ve only use sweetwater labels in the past but I may give this a try. Seems super easy and inexpensive option.
I love to use my printer and try different ways and graphics.
I begin with a square of light colored fabric that I fold on a diagonal then write on the triangle with a fabric pen. Next I heat set the ink with my iron before sewing it on when I sew on the binding.
I like to create an envelope from light coloured fabric, hand stitch it to the back after quilting, then pop in little notes for care and personal info.etc. I also like to use a spare block which I hand embroider. If I’m in a hurry I’ll print with fine permanent fine tip pens.
I recently learned how to do hand embroidery so I write out a label as described above and then embroider over my handwriting.
I often use a leftover quilt block, or a smaller version of the blocks on the front of the quilt as a label. I often use the lettering that came with my machine to stitch (instead of write) on the label.
I like to make/personalize my quilt labels using machine embroidery. I’m eager to try Kimberly’s method, to see which method I like the best.
I attach triangular labels in the corner and stitch two edges with the binding. Whip stitch the long side of the label by hand. If I want to “hide” the label , I use the backing fabric. I have embroidered the label and used pens.
I’ve used small purchased labels. I like the idea of making my own. Seeing everyone’s comments provides a lot of inspiration & ideas I never thought of. Thanks for sharing!
I’ve used small purchased labels. I like the idea of making my own. Seeing everyone’s comments provides a lot of inspiration & ideas I never thought of. Thanks for sharing!
I sew labels in the binding that I got from an Etsy shop.
When I remember, I have been using sweet water labels but I love the idea of having my handwriting on the label.
I make a quilt block which coordinates with the top but has plain patches to write on then add the quilt name, my name (& LAQ if not by me), date & location. Pigma pens are my favourite.
I typically have used my embroidery machine and software to make labels but for some quilts I would prefer to use the Ben’s and write my labels. I either tuck my labels into the corners (using triangular labels) or I work them into a block.
Ive been using my laser printer but it fades when washed. I didn’t know this. I like this way of making labels. The Pigma marker may not fade
I’ve embroidered my info on a piece of fabric that I’ve framed in a border fabric and then sewed it on the quilt. I also gotten hooked on Sweetwater quilt labels. I also use pigma pens.
I sometimes use an extra block as a label. Usually, I take a 6 inch square of fabric, fold diagonally, add information with a pigma pen and sew on with my binding.
I often just sign and date the back of the quilt or fold a square on the diagonal and sew it into a corner with the binding.
I’m fortunate enough to have a friend who will embroider a label for me, but your process would be so much more convenient! Thank you for sharing.
I’ve never put a quilt label on before, but you make it look so easy! Thanks so much!
I’ve been buying personalized printed labels from a seller on Etsy. I like them, but it can get expensive. I’m so glad for this template and tutorial — now I can make my own! The pens would be awesome.
I was using Sweetwater.Labels one of the SS had a label booklet was wondering how to use it Ty for great info
Thanks for all the info. I think I stress more about labels than the actual quilt!!
On my last quilt, I made two fabric scrap triangle corners to attach while binding. . I used my sewing machine’s monogram feature to stitch my name & hometown, 2024 and the quilt pattern name on the triangles. The quilt also just happened to be the FQS Patriotic box of Stars & Stripes… (I am able to insert a piece of molding in the triangle corners to hang the quilt)
I have been purchasing premade labels and they are costing me a fortune. I would love to be able to make make my own. This is a great post. Thank you for this.
I make my labels on my embroidery machine, but I am going to make a
handmade label for a wedding ring quilt I made for my grandson and his wife.
Thank You Kimberly, for giving us this information, template, and tutorial.
Kimberly thank you for the information on embellishing quilt lables. Freezer paper, genius!
I make a triangle shaped lable which nicely fits in the corner. Use an archival ink pen and include my name, city, name of quilt pattern, and year. But had a quilt in quilt show, they also wanted name of the person who did the quilting.
I love using the Sweetwater quilt labels. Have been using them for years.
I use my embroidery machine to sew my labels. I love a pieced backing with an extra block with my label included, but my favorite way is to sneak it in, hidden somewhere on the front!
I used a Lori Holt label and embroidered my information after I wrote it on the fabric.. I was concerned the ink would fade away.
I like to use my embroidery machine to make labels as they turn out great. Would love to try this tutorial.. just need the pens. 🥰
Usually, I use embroidery for my labels. Haven’t tried handwritten yet. Will use this and see how they hold up.
Thank you!
Unfortunately, I don’t label all my quilts. I need to get better at doing that. I use a micron pen and write the info on a piece of muslin and applique to the back of the quilt. Nothing fancy.
I make my labels with me embroidery machine. I hand sew them on.
I’ve used several techniques, but my go to is to fold a square piece of fabric on the diagonal. Then sew it into the lower right corner of the binding. To finish I hand sew across the top. The double fabric allows the wording to be seen without the backing showing through.
I use either a printed panel label like Lori Holt’s or I fold a coordinating fabric square in half on the diagonal to make a Hst that I put in a bottom corner. I either write with a permanent marker or use the letter stitching on my old 1980’s Janome but they aren’t very big. I always tuck the label into the binding, usually in a corner. I have never pieced it into the backing (yet).
I’ve probably made over a hundred quilts, but I have never labeled any of them. I like the idea of it. Maybe someday!
I put the usual name, place, and date. Also, I like to hand embroider and usually add some type of decoration to my label.
I usually put my name and the year on the quilt. I had some labeled made up years ago but I can’t find them so I had to make one for my last quilt. This tutorial is perfect.
I usually embroider my name and date on a scrap and place it on the back lower corner.
Since our quilting guild had a presentation on quilt labels I now always label my quilts unless it is going to be a well-used throw blanket. I put my name, quilter’s name, month & year, and the pattern name.
I like to fold a 5″ square (or a little larger) diagonally to form a triangle, press and align the raw edges with a corner, pin or glue down to stay in place, and attach it as you bind the quilt.
I stitch right onto my binding using the alphabet on my sewing machine – made by (my name), who quilt is for and year made before attaching binding to my quilt. I also put a triangle square in corner of quilt sewn into binding as well with maker information.
I have never added a label to a quilt, never saw the need for it before. Your advice saying it’s like an artist signing their work, makes me think I might give it a try, especially if it’s going to someone outside the family. Thank you!
I usually make an extra block and place it on the back. If the block size is too big, I will make a block like your tutorial and frame it with some of the quilt fabric. Love FQS!
I type my labels in a word-processing program exactly how I want them to look and choose a cute font. I then print it out and use a light box to trace over the words on the printed label onto quilting cotton. I usually add fun doodles and a border finish it off!
I usually make embroidered labels with my sewing machine. But sometimes I use a ribbon printed label with my name only. But I think I’ll give this idea a try. It’s faster and personal. Thanks 😊
OH ! Thanks for the template – this is going to come in handy – I could use some permanent pens !! LOVE !
Well, so far I have only used my embroidery machine to label my completed quilts with my initials and the finished #. Now, I know how to use the labels from the SS box so, thank you for this! I cannot wait to try this method.
I have a friend who embroiders labels for me. She she surprised me with them as a gift. Lucky me!
I fuse a lightweight stabilizer to the back of a fabric rectangle and hand write the information/ sentiments that I want to include on it. To further accent, I will sometimes attach it to a quilt block or frame it with fabrics from the quilt, prior to hand sewing it to the back of the finished quilt back. I have also used printed fabric labels like Lori Holt’s.
I use the freezer paper and fabric method with a laser printer and set the ink with a hot iron. I do wonder if it will last through many washings. Pigma pens may be a better way for me!
My favorite way to label a quilt is with an embroidery design with personalized information. I stitch it out on my embroidery machine, cut out a rectangle around it, then “bind” it with a contrasting fabric. Then I pin it to the back of the quilt and hand stitch it on.
I write out my quilt labels with a Micron Pen. I attach them by hand or sew them into the binding.
i have wanted to label but havent made that many. Now I will start since I have the means!
I fold a square of fabric into a triangle, write my info with a pigma pen and then sew into a corner of the quilt when I’m putting on the binding. If I’m feeling creative I take one of the left over blocks or HST and use that on the label.
I purchased personalized labels from Sweetwater for table toppers.
My daughter purchased some tags with my name for the self binding baby blankets that I love to make and gift. She keeps telling me I’m ready to make bigger quilts and I’m sure she would love to see these labels on them. I will definitely try them.
I use Sweetwater labels but I always use a Pima pen to add the date and iron set it. I used to make my own labels, but Sweetwater labels are just so darn cute and easy!!
I use a doubled piece of fabric matching the front of the quilt. I size it to fit the information I need to put on the quilt. A piece of the background fabric usually works, or an extra block. If the backing fabric shows through I line it with a piece of white fabric. Use fabric markers. Heat set. Sew it into the binding and hand stitch it down.
The information I include is:
* Handmade for ( whomever)
* Date completed or date and type of celebration (happy 21st birthday)
* Name of quilt ( I don’t always use the pattern name. Had one quilt with frogs. Titled it ‘Froggy went a’courtin’)
*Made by My Name, with love
* Quilted by ( ALWAYS acknowledge your longarmer)
I love to label my quilts with a square folded in half in the corner sewn into the binding. I use a scrub a dub sharpie.
I’m going to try the Fat Quarter Shop Template, this will be my first quilt label. I’ve labeled smaller projects with “Handmade” labels from etsy.
Quilt Labels have always been easy for me, and it’s all because of my name. 🙂 With the last name of Oaks, I’ve used an oak leaf shape or an acorn shape for my labels. I’ve found that the acorn shape is much easier to get all the information on, just because of the shape, so I use that more now. I do love the Oak leaf shape, but it’s not nearly as easy to get information on. 🙂
I design my labels in a word document and print on EQ Inkjet Printable Cotton Basic Fabric Sheets.
I use a rectangle of white fabric and sew it with information and my name into a corner of the back of the quilt.
I’ve been using Sweetwater labels but am looking for something more custom, so appreciate the info in your blog post!
I usually use a scrap of the quilt fabric and embroidery the label with my embroidery machine.
My favorite method is machine embroidery but I have lots of experience with handmade labels too! These must be used with the archival ink and heat-set so they last. Either way…depends on the quilt and how it will be used.
I use double sided fusible on fabric. I write my information on it, them iron it onto the back of the quilt. I then stitch around the edges. I have read some very good ideas in the comments. Thank you.
I am a beginner and have not labeled my few quilts. I plan to try this method to personalize my quilts. Sounds pretty simple! Thank you for all your tips and help.
I rarely label my quilts but recent recipients have been asking me to so this information is both timely and helpful, thank you!
Fat Quarter Shop, a “big thank you for your generous giveaways!! It’s so appreciated as a quilter. And as always, the videos on YouTube are so helpful and always give me inspiration and encouragement.
The option creating labels using the Pigma Pens by Sakura is very inspiring and challenging to me because I love to doodle with pens as well! I would love to make my own labels with these beautiful set of pens!! I have used Photoshop to design my quilt labels so this could be my new go-to way for creating labels for my quilts and projects.
I use labels from Lori holt panel or other label panels and I will apply the label as centered and machine top stitched to back. I usually use permanent marker to write info.
I started getting the Sweetwater labels after seeing Kimberly using them. It really has helped me label my quilts right after I finish the binding. Now to go back & label quilts from years & years ago!
I tend to use printable fabric, but I find it to be difficult to attach a border to or blanket stitch because it’s too thick.
Thanks for this awesome tutorial! I have only ever labeled one quilt and I did it by making my machine stitch the words…. It was kind of a pain, so this tutorial is very welcome. Seemsmuch simpler!
I like using a piece from the quilt and making a triangle to sew in the corner
I like to make little blocks that match those on the quilt top, then use them as borders on my label. Or if the top has appliques, I make a small version of the applique to put on the label.
I type the information on my computer. I then cut fabric the same size as my printer paper. I glue the piece of fabric to the paper using Elmer’s stick glue. I press to dry glue. Then I put this sheet in my paper tray on printer and print. I heat press with my iron to set the ink. Then I cut to size and remove the paper on back and press the edges back and hand sew onto the button edge of quilt.
I write my quilt information with a Pixma pen. First, I made a 4”x5” “mask” on white paper and drew dark lines on it. I put the lined paper under the chosen quilt label fabric and put it on a light box so I can write my information using the lines underneath. Next, I sew a border on the label and then sew it by hand to the back of my quilt.
I do have a great supply of the Sweetwater labels but I have also purchased the preprinted ones from various designers.
When I first started quilting I did make my own labels using plain fabric and writing on them with the Pigma pens, these also work quiet well for a while.
I love antique quilts that have a name and year either written or embroidered on the front of the quilt so I like to put my name and year made on the front of my quilts in a somewhat hidden place. Also if I have light backing on my quilt, write on the backing, mostly for small quilts. Or cut square of light fabric, frame it with quilt fabric and hand print/write my information using Pigma Micron pens and freezer paper.
I download a picture from free clip art and add the quilt information I want onto it. Then using printable fabric I print the label to be stitched onto the quilt