
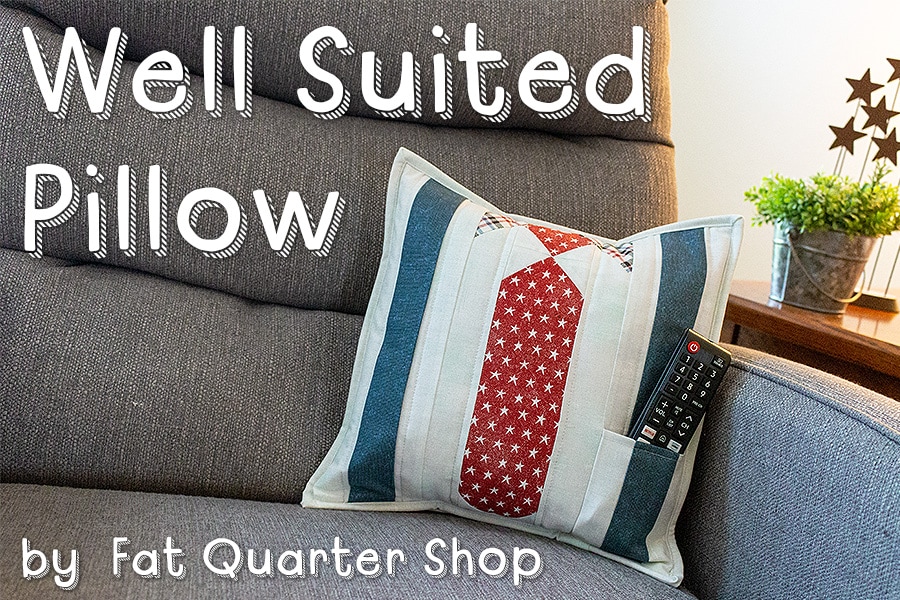
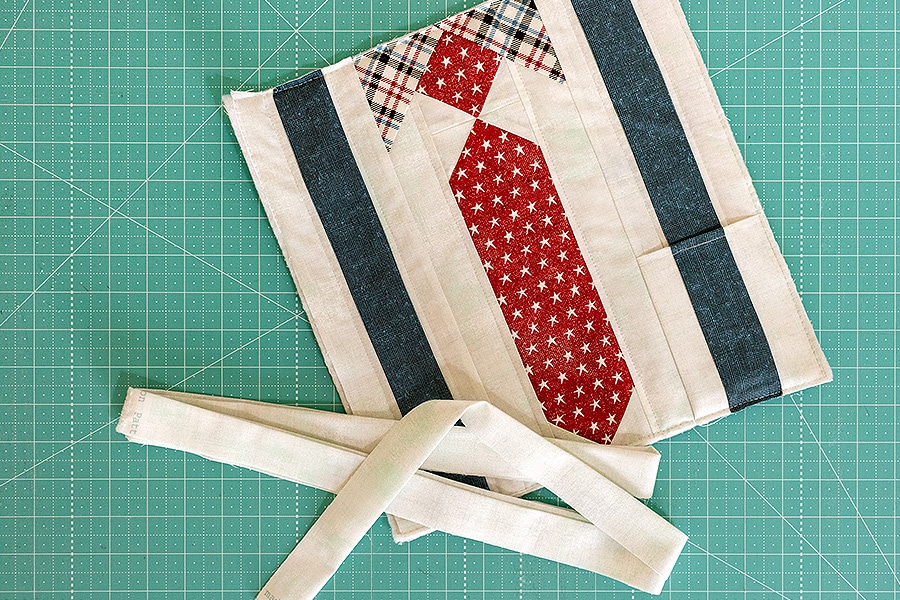
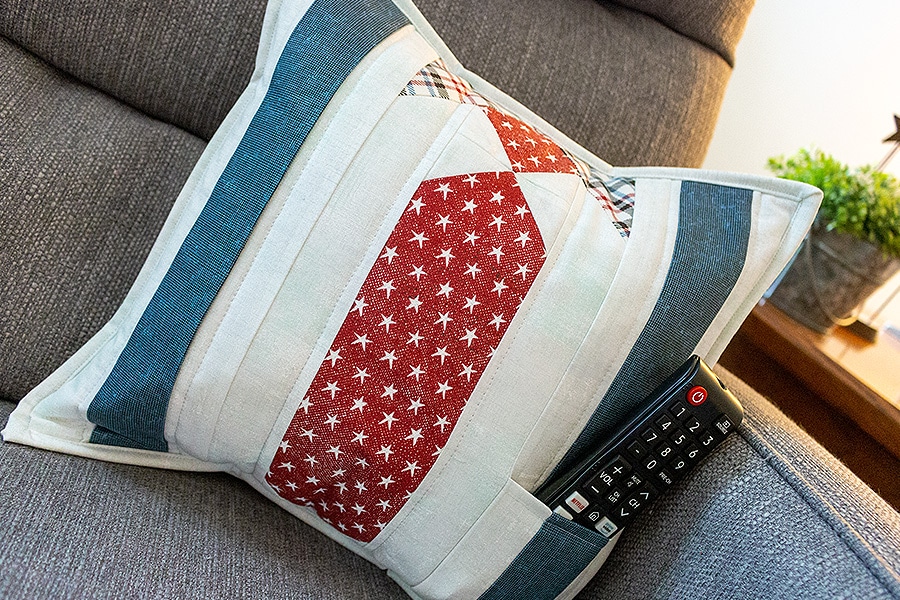
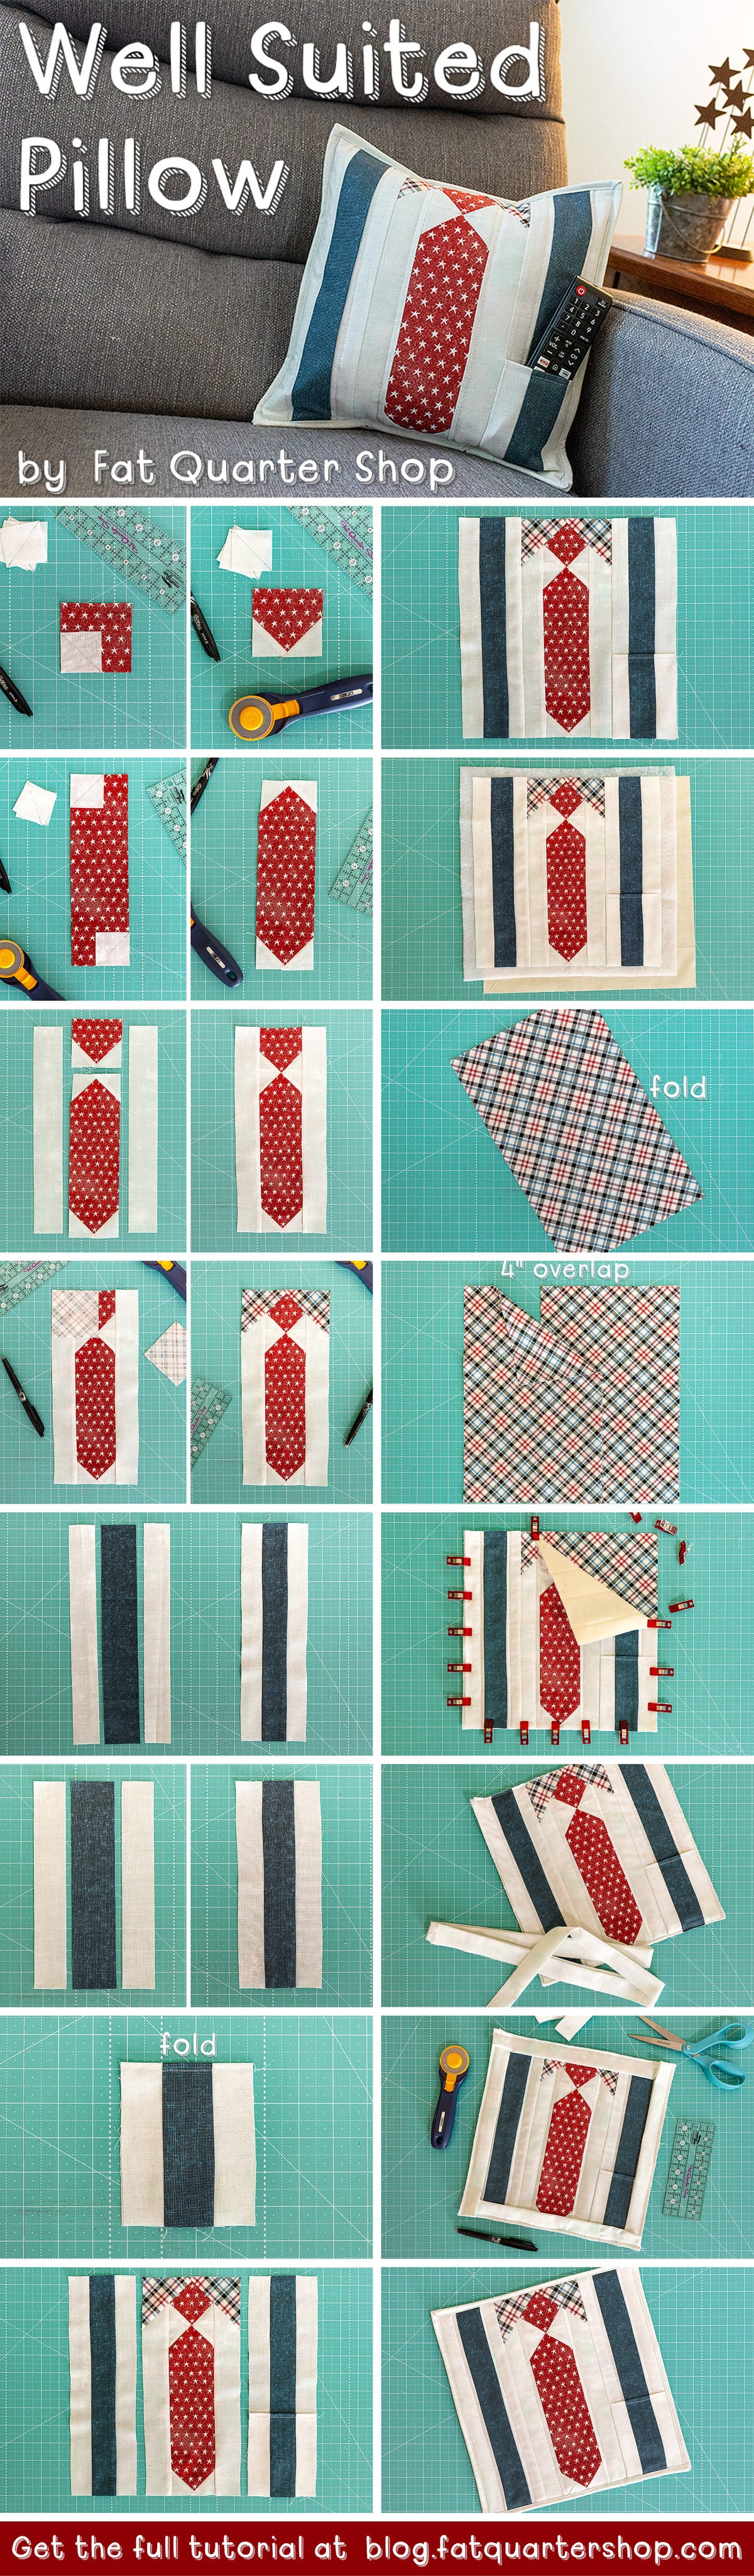
Hi, it’s Sarah here – and I am sew excited to share my Well Suited Pillow with you today! I thought this would make a fun Father’s Day project. When I was younger we would always get my dad a new tie for Father’s Day, I loved picking up bright and colorful ties. It would always make me so happy to see my dad wearing one of the ties my brother and I helped pick out, no matter how crazy they looked. As a nod to the days of picking out ties for my dad, I created the Well Suited Pillow. To honor the “king of the remote” I have added a special remote pocket!
For my pillow I have featured the Branded collection by Sweetwater for Moda Fabrics. Just like all dads are unique, there are plenty of fabrics you could easily use instead (We have drawn up a few other fabric collections after the tutorial that would also be really fun). Since this pillow isn’t going to make itself … let’s get started!
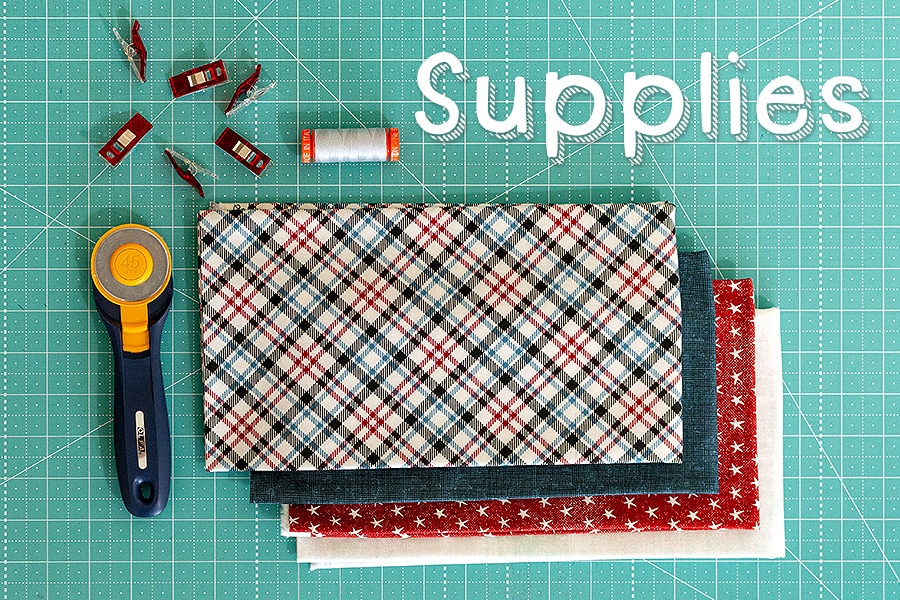
Fabric Requirements & Cutting:
- 1/2 yard Background fabric (SKU# 30150-150)
- 2 – 1.75″ x 12.5″ rectangles
- 6 – 1.75″ squares
- 4 – 1.5″x 5″ rectangles
- 2 – 1.5″ x 9.5″ rectangles
- 2 – 2.5″ x WOF strips
- Fat eighth Tie fabric (SKU# 5781-11)
- 1 – 3″ x 10″ rectangle
- 1 – 3″ square
- Fat eighth Suspenders fabric (SKU# 5783-16)
- 2 – 2″ x 12.5″ rectangles
- 1 – 2″ x 9.5″ rectangle
- 1/2 yard Lapel and Pillow Back fabric (SKU# 5786-14)
- 2 – 14″ x 18″ rectangles
- 2 – 3″ squares
- Fat quarter muslin for pillow quilting
- 1 – 14″ square
- Craft size package of batting
- 1 – 14″ square
- 12″ pillow insert
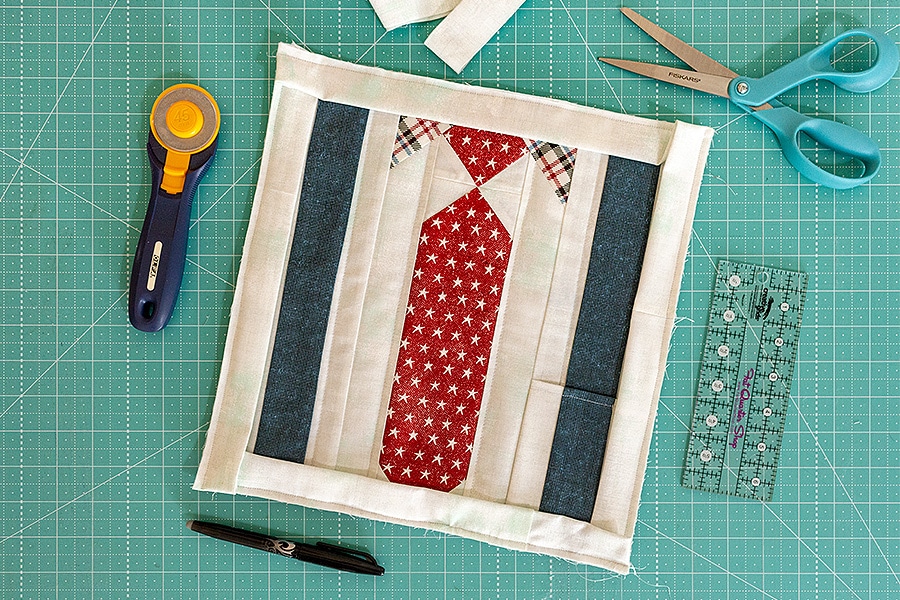
Piecing Instructions:
-
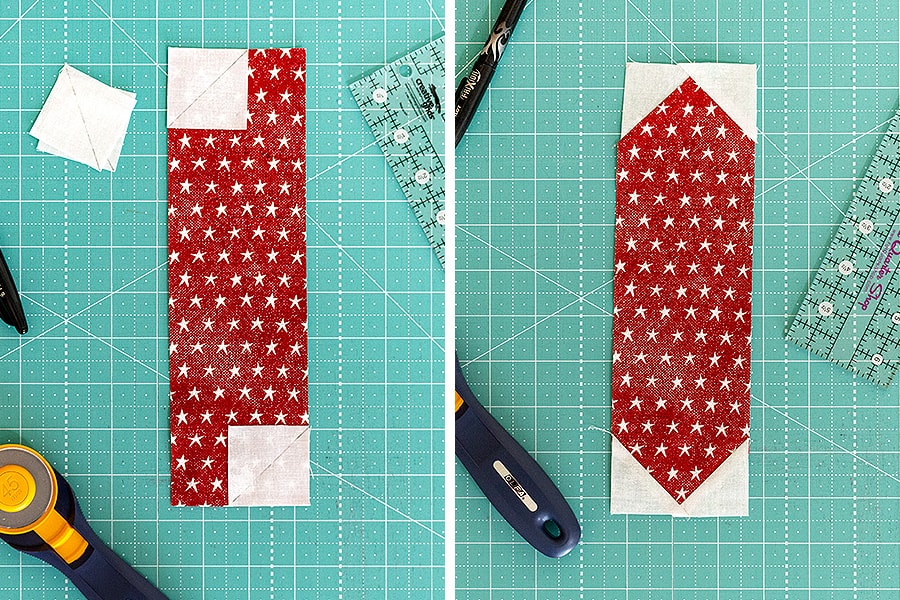
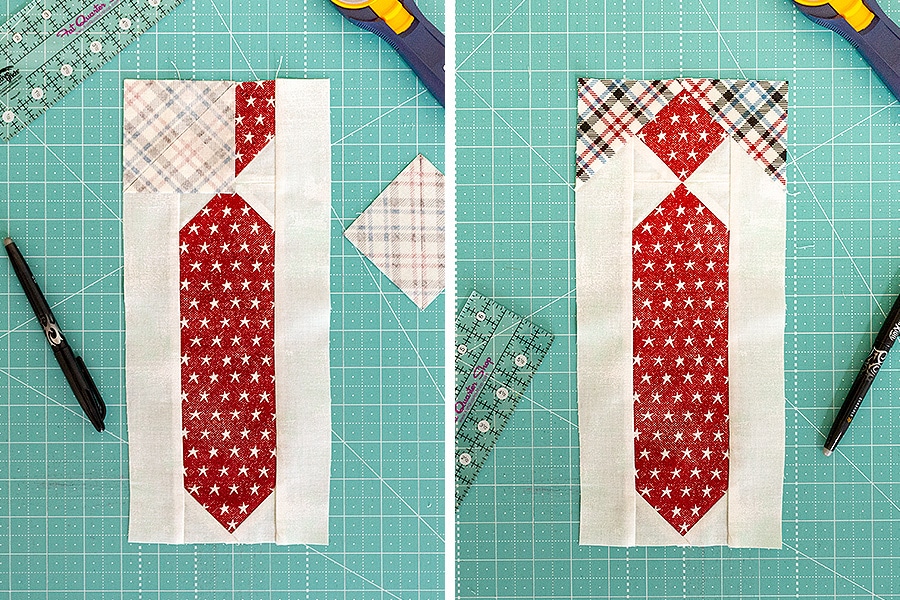
- Draw a diagonal line on the wrong side of the 1.75″ background squares. With right sides facing, layer two 1.75″ background squares on the bottom corners of the 3″ tie square. Stitch on the drawn line and trim 1/4″ away from the seam. Top Tie Unit should measure 3″ x 3″. Make one.

- With right sides facing, layer four 1.75″ background squares on all four corners of the 3″ x 10″ tie rectangle. Stitch on the drawn line and trim 1/4″ away from the seam. Bottom Tie Unit should measure 3″ x 10″. Make one.
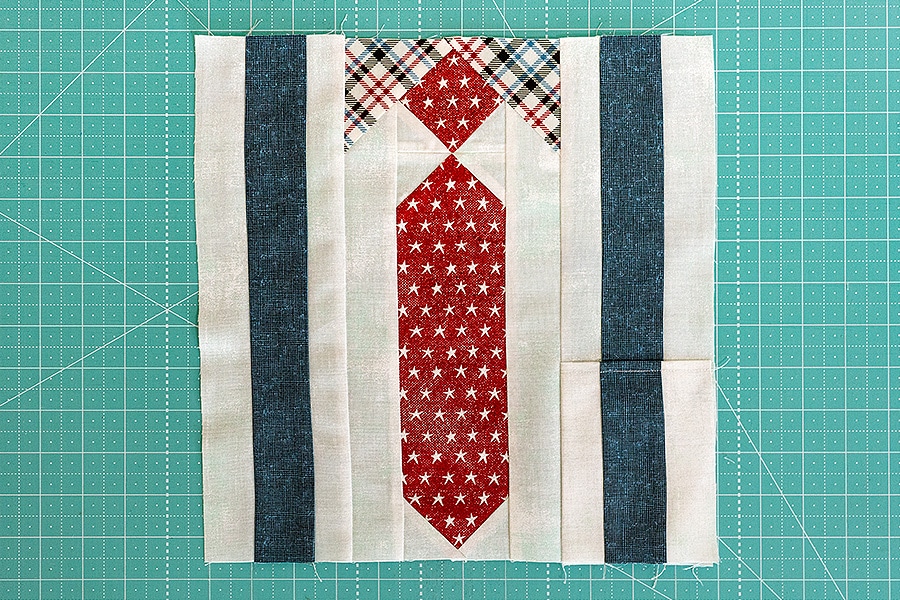
- Assemble the Top Tie Unit, the Bottom Tie Unit and two 1.75″ x 12.5″ background rectangles. Tie Unit should measure 5.5″ x 12.5″. Make one.
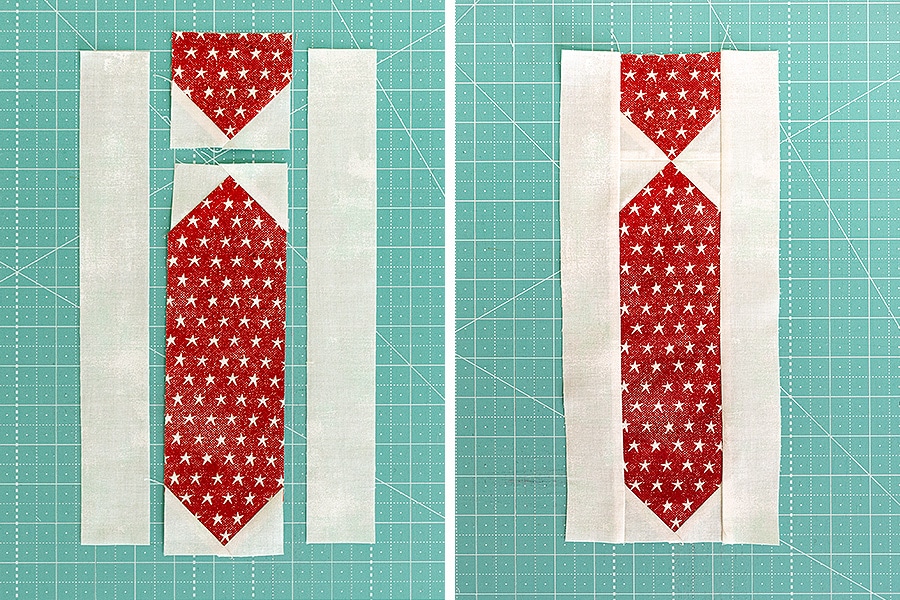
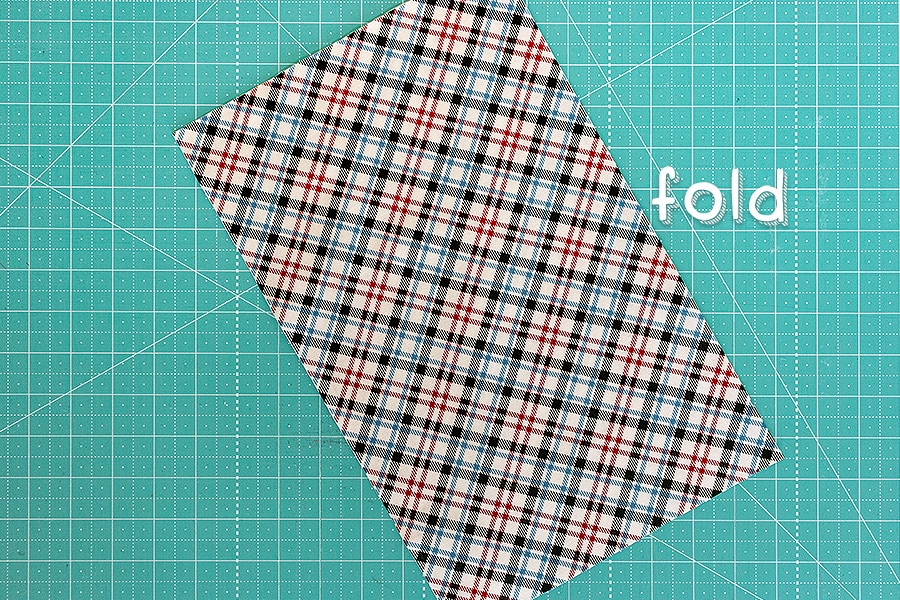
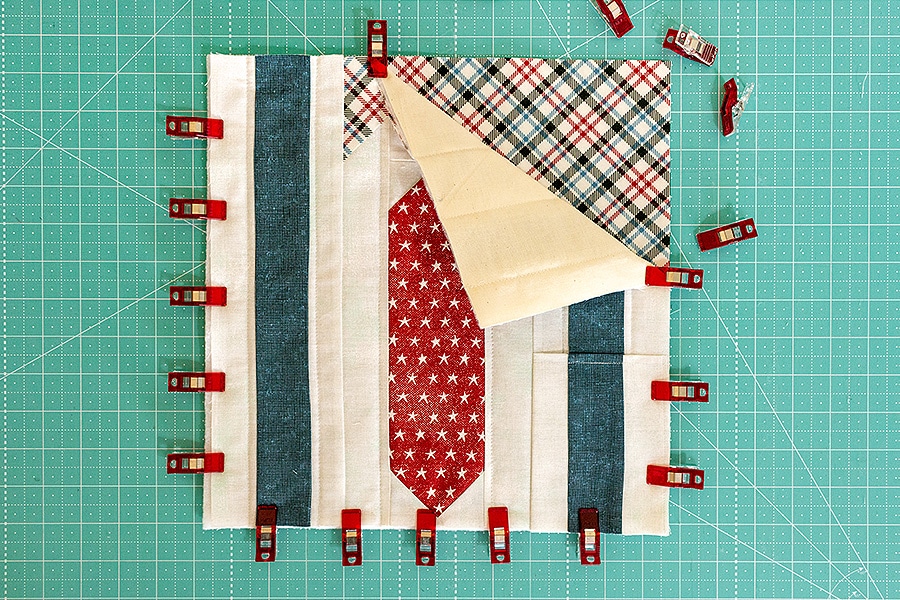
- Draw a diagonal line on the wrong side of the 3″ lapel squares. With right sides facing, layer two 3″ lapel squares on the top corners of the Tie Unit. Stitch on the drawn line and trim 1/4″ away from the seam. Middle Well Suited Unit should measure 5.5″ x 12.5″. Make one.
- Assemble the two 1.5″ x 12.5″ background rectangles and one 2″ x 12.5″ suspenders rectangle. Suspenders Unit should measure 4″ x 12.5″. Make two.
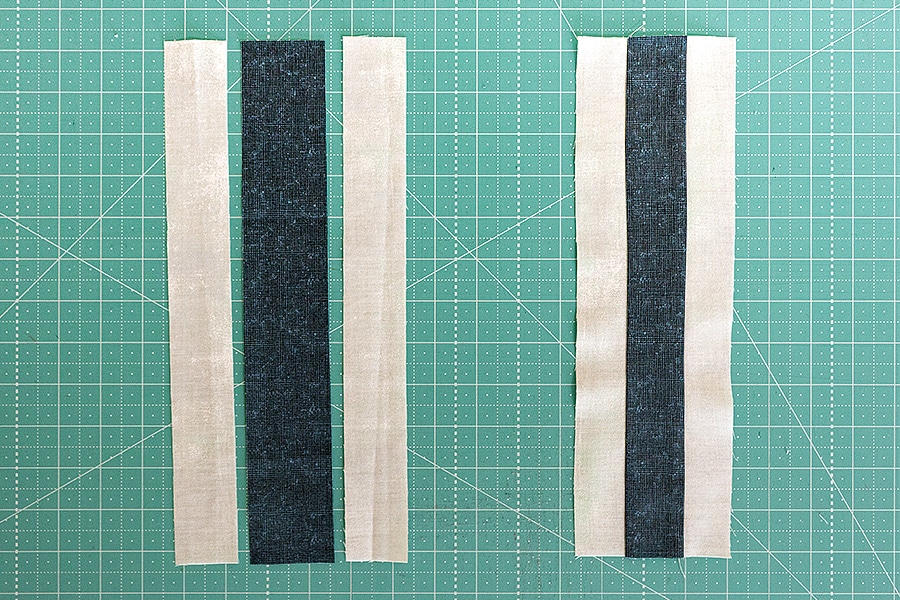
- Assemble the two 1.5″ x 9.5″ background rectangles and one 2″ x 9.5″ suspenders rectangle. Partial Pocket Unit should measure 4″ x 9.5″. Make one.

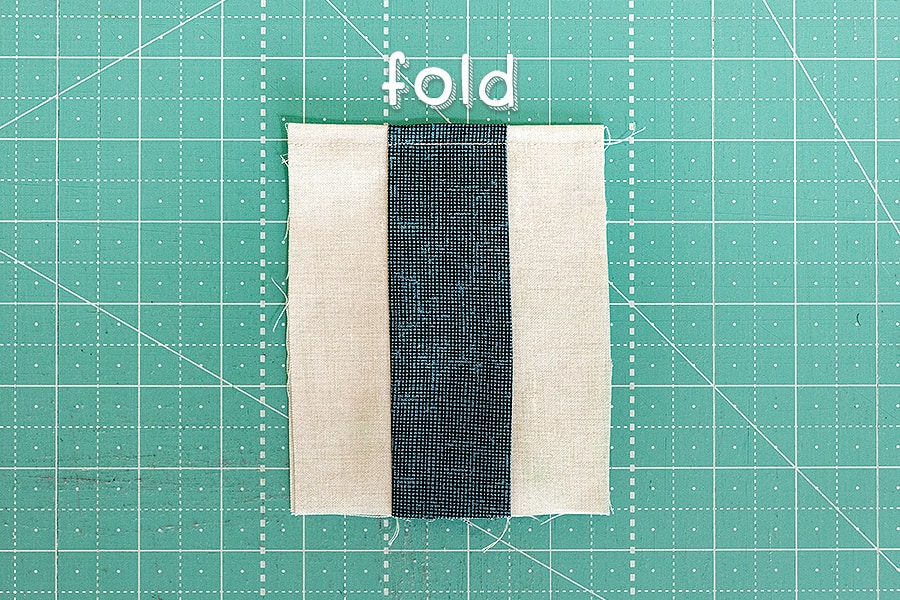
- With wrong sides facing, fold the Partial Pocket Unit in half. With matching thread, topstitch along top edge to finish the pocket. Pocket Unit should measure 4″ x 4.75″. Make one.
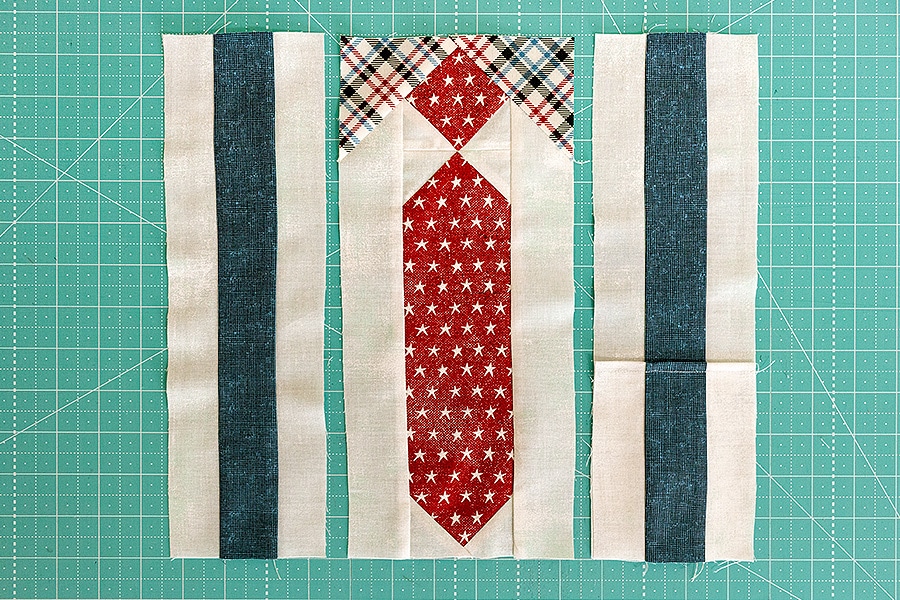
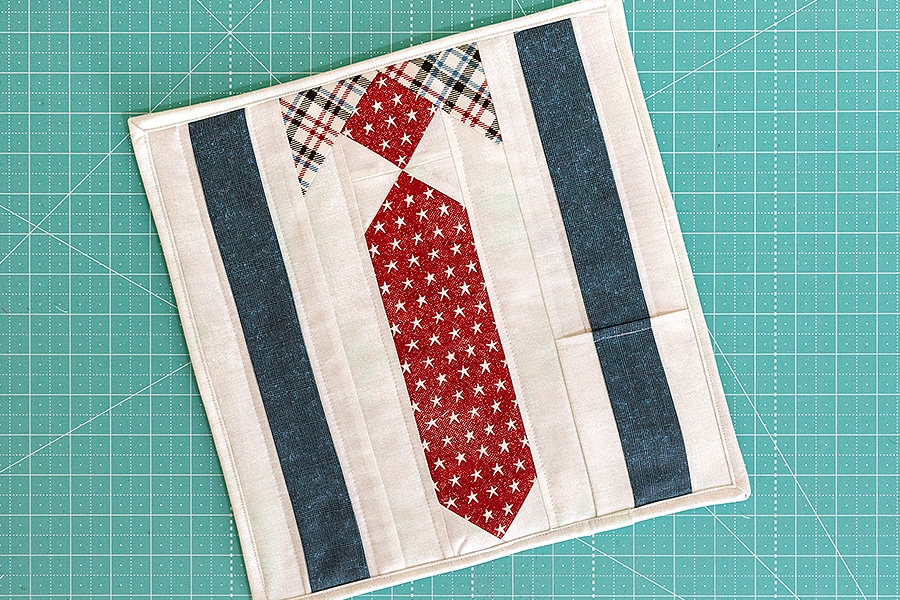
- Assemble the remaining Suspenders Unit, the Middle Well Suited Unit and the Pocket Unit. Well Suited Block should measure 12.5″ x 12.5″. Make one.
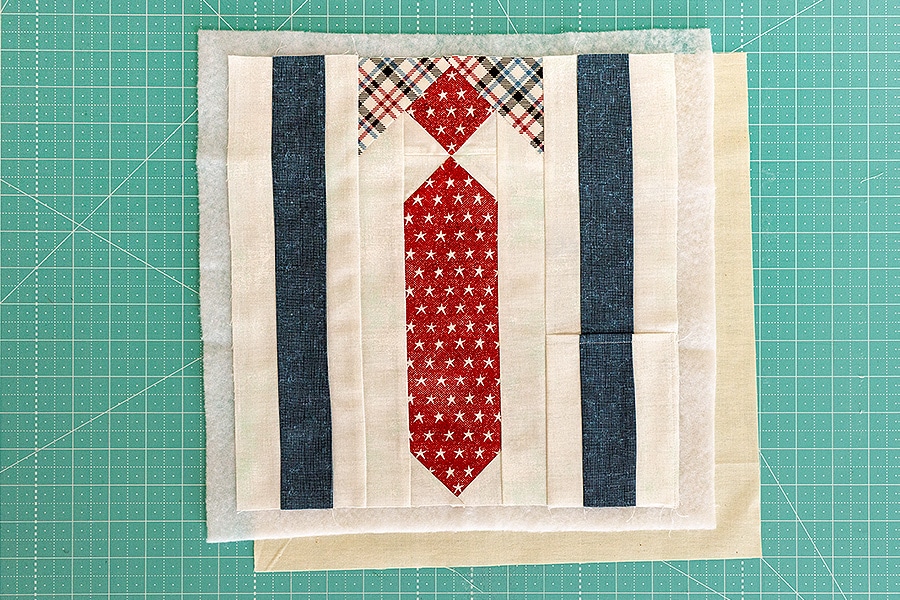
- Layer the Well Suited Block, the 14″ batting square and the 14″ muslin square. Quilt as desired. Make sure not to quilt over the Partial Pocket Unit. Trim excess batting and muslin.
- With wrong sides facing, fold the 14″ x 18″ pillow back rectangle in half. Partial Pillow Back should measure 9″ x 14″. Make two.
- Later the two Partial Pillow Backs and overlap them 4″ with the fold in the center and raw edges on the outside. Pin in place. TRIM Pillow Back to measure 12.5″ x 12.5″ (or same size as your Pillow Top). Make one.

- Layer the Pillow Top right side up on the Pillow Back. Baste around the edge.
- Piece the 2.5″ x WOF background strips end to end for binding. Bind the pillow as desired.
- Add a 12″ pillow form.
- Draw a diagonal line on the wrong side of the 1.75″ background squares. With right sides facing, layer two 1.75″ background squares on the bottom corners of the 3″ tie square. Stitch on the drawn line and trim 1/4″ away from the seam. Top Tie Unit should measure 3″ x 3″. Make one.
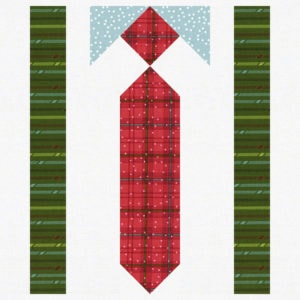
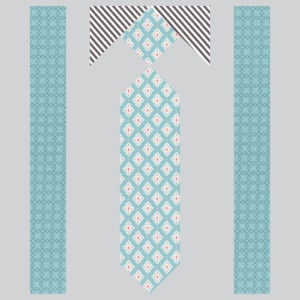
Our pillow has a patriotic look, but maybe you want a different look? Here’s a few other options we mocked up! We used Better Not Pout by Nancy Halvorsen for Benartex Fabrics and Bloomington by Lella Boutique for Moda Fabrics.
Share with #wellsuitedpillow
We would love to see your next project – be sure to share using #wellsuitedpillow and #chunkythread hashtag and tag us (@fatquartershop) so we can see and share your work!
Sew Pin-able!
14 comments
LOVE IT!!! Hubby loves Pillows of all Shapes and Sizes – and he wears a Suit to work (mandatory).
Perfect!!!
gonna make several. 1 for hubby, 2 for sons, 4 for grands
This is just too cute for words! Love it!!
I’m confused, once you add the 12″ pillow form, how do you close it? Do you hand sew it? The directions are not friendly to a a beginner.
If you look at Step,11 you will see there is an overlap. It’s an envelope pillow. Just slide the pillow form in the back overlap.
P.S. You don’t sew the overlap shut. This way you can launder the cover.
Thanks Gen! I want to try this, but intimidated by the confusing directions!
The pillow back measures 14″ square, the front is 12.5″, the photo shows they match up. How can this be? Do I trim down the back?
Yes. It should be the smaller dimension. There is another error in cutting. The 4 background at 5” should be 12 1/2 inches. And you won’t need 2 of the 1 3/4” background squares. Fun pillow but quite a few errors here
I love this pattern as it reminds me of sundays with my dad and brothers and sister going to church.
That is TOO CUTE!! Too bad my dad and hubby are both gone. I don’t think the remote around here would ever be in that pocket though. That would be too easy. HA Great tutorial.
The use of the term “lapel” is a little misleading. A lapel is the longish part on each side of a coat, blazer, or jacket (where you would place a lapel pin or boutonnière). The two triangular pieces that are above the knot of the necktie should be called “collar” pieces.
There is a mistake in the background cutting instructions – you need 4 – 1.5″X 12.5″ strips (not 1.5″ X 5″ as is listed in the patter)…I had cut everything and couldn’t figure out why I didn’t have enough strips long enough to dew to the suspenders…lol
Just FYI.
Super-cure pattern. My Dad is going to love it. <3
Great projects. I appreciate all the free patterns. It would be great if y’all could put a print button or a PDF button at the bottom so we could print them and save them. Thank you so very much.