
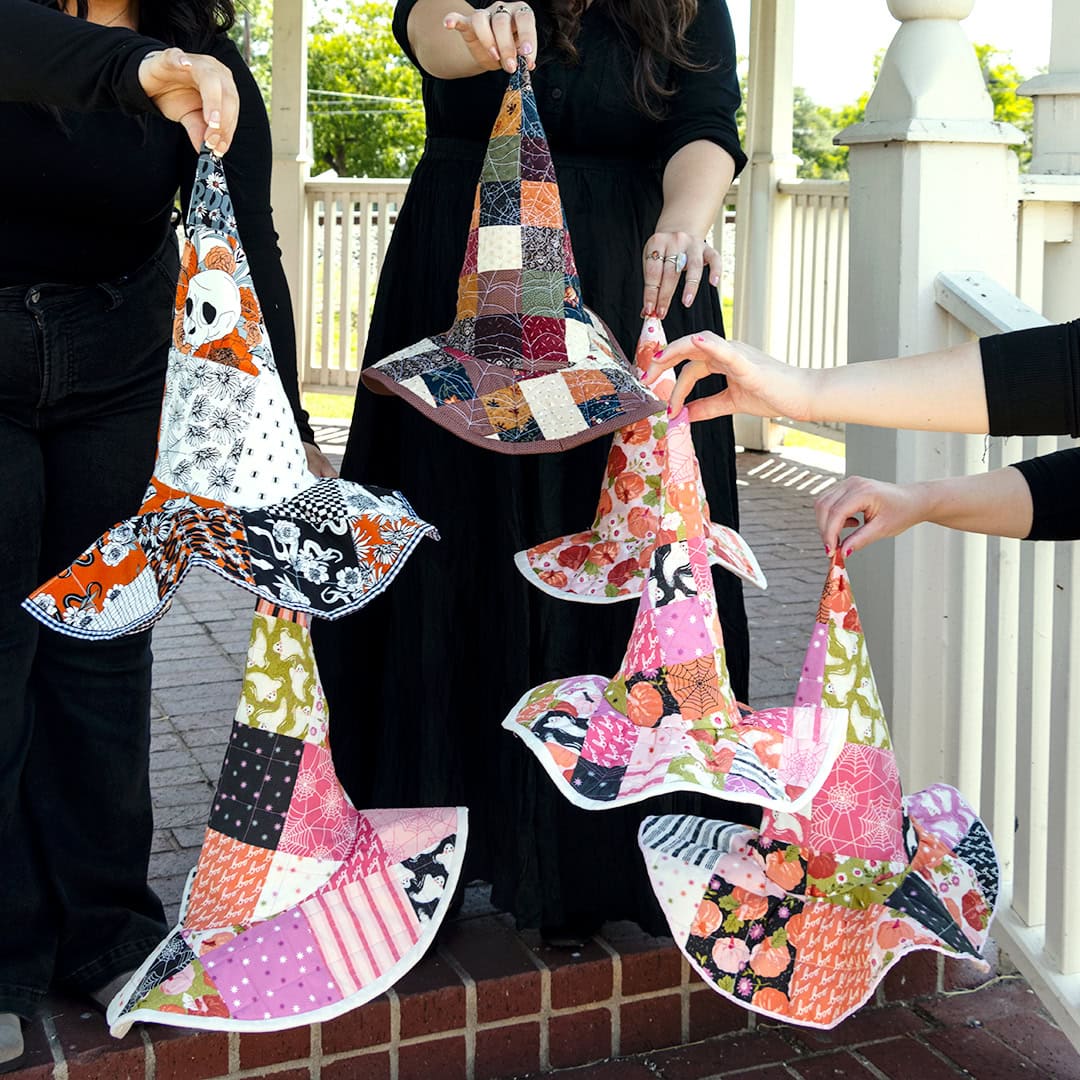
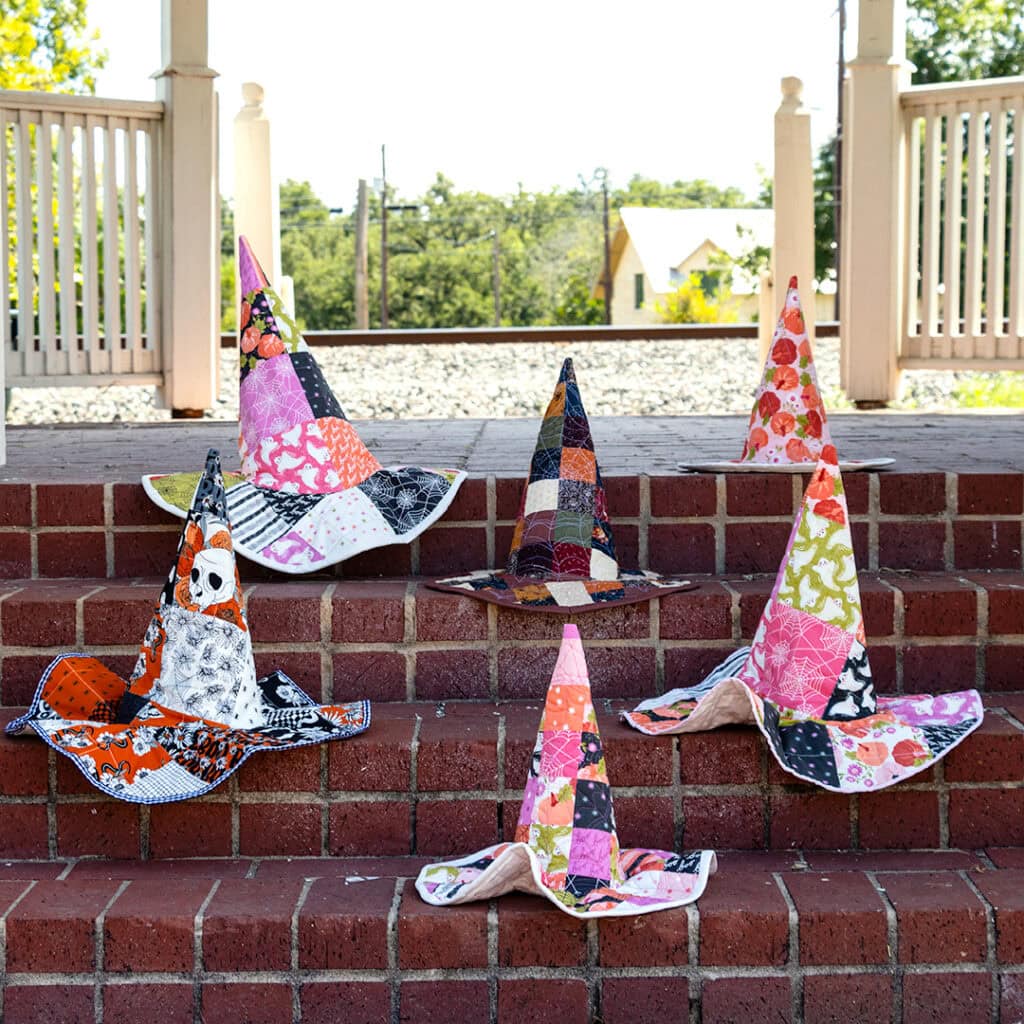
Tis the season for spooks, scares, scrap-busting, and sewing! These Scrappy Witch’s Hats are a quick and frighteningly fun make for the spooky season. For our Scrappy Witch’s Hats, we’re using Charm Packs and MINI Charm Packs to make adult and child sizes so that every witch and warlock in the family can get in on the magic!
1. Pick Your Size and Scrappy Fabric
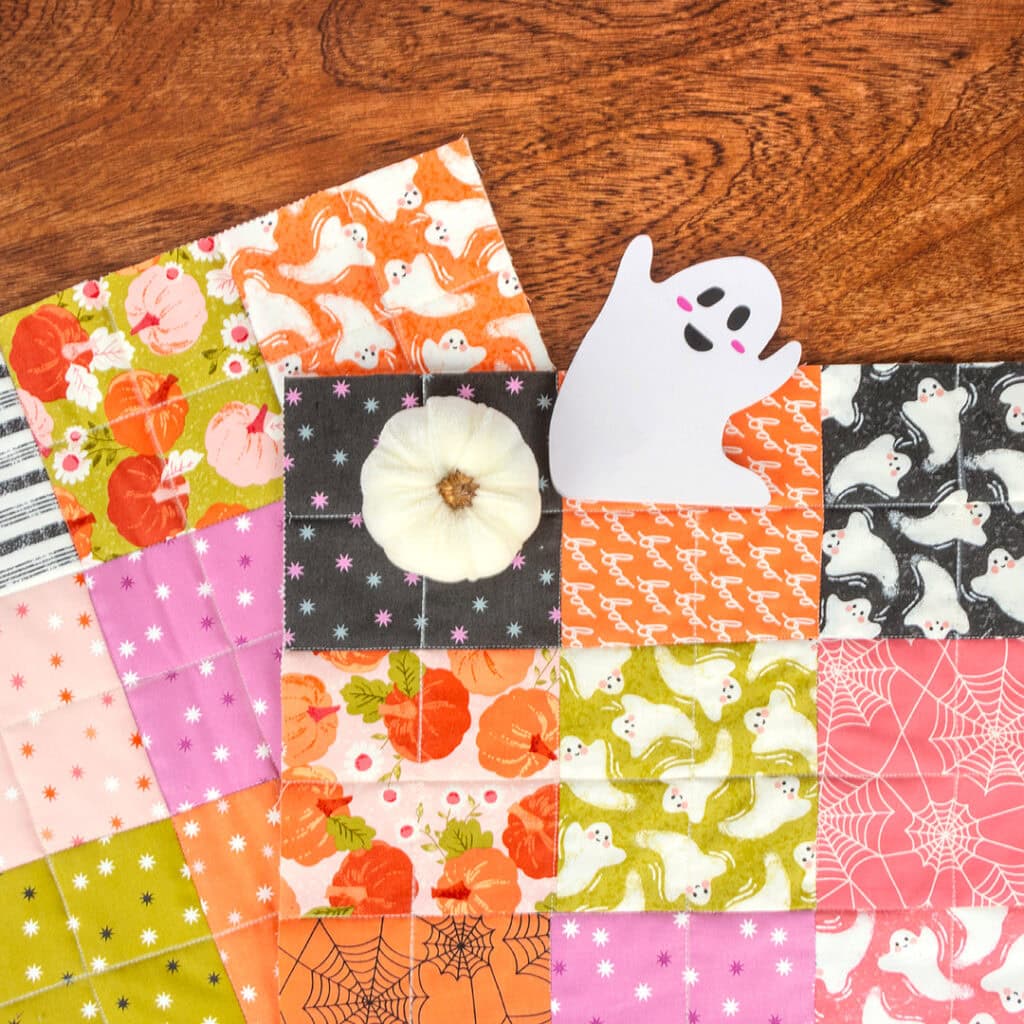
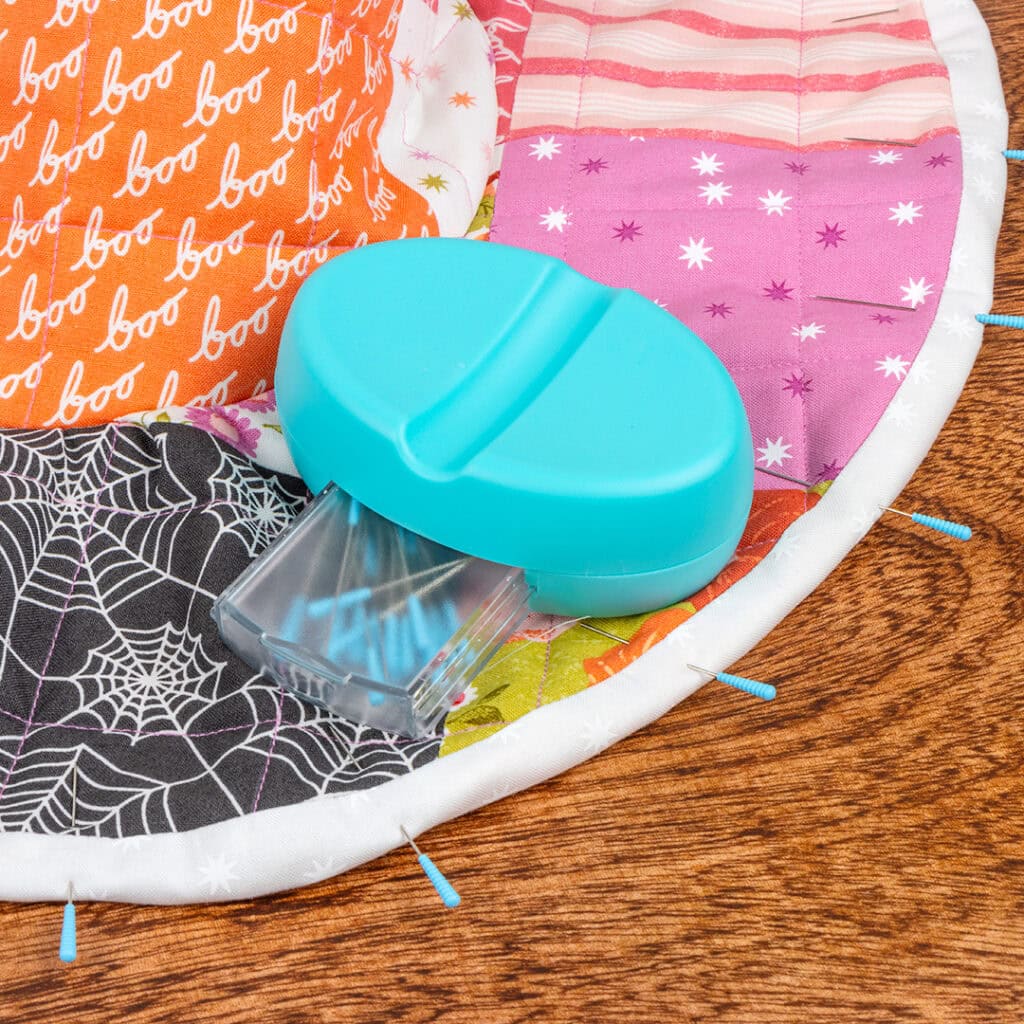
We love the scrappy look for these hats, and an easy way to get that look without dipping into your stash is to pick up a Charm Pack or MINI Charm Pack in a fabric collection that you love. We used Hey Boo Charm and MINI Charm Packs by Lella Boutique for Moda Fabrics, Noir Charm Packs by Alli K Designs for Moda Fabrics, and Clover Blossom Farm MINI Charm Packs by Kansas Troubles Quilters for Moda Fabrics to make ours and we are simply bewitched with how they turned out!
If you’re making an adult-sized Scrappy Witch’s Hat, you will need:
If you’re making a child-sized Scrappy Witch’s Hat, you will need:
- Three MINI Charm Packs
- 1/2 Yard of Backing/Binding Fabric
- 1/2 Yard of Batting
- Optional: Ribbon for Binding
***Note: Our Scrappy Witch’s Hats are designed to sit on top of the head instead of fitting snugly around the head. See step 3 for notes on how to adjust the measurements to increase the sizing on your hat for a more snug fit!
2. Make Two Quilt Sandwitches
Now that you’ve picked the fabric you want to use and which size you’re making, the first ingredients of a Scrappy Witch’s Hat are two quilt sandwiches. As you magic your way through this tutorial, make sure that you’re following measurements for the size hat you picked in step 1!
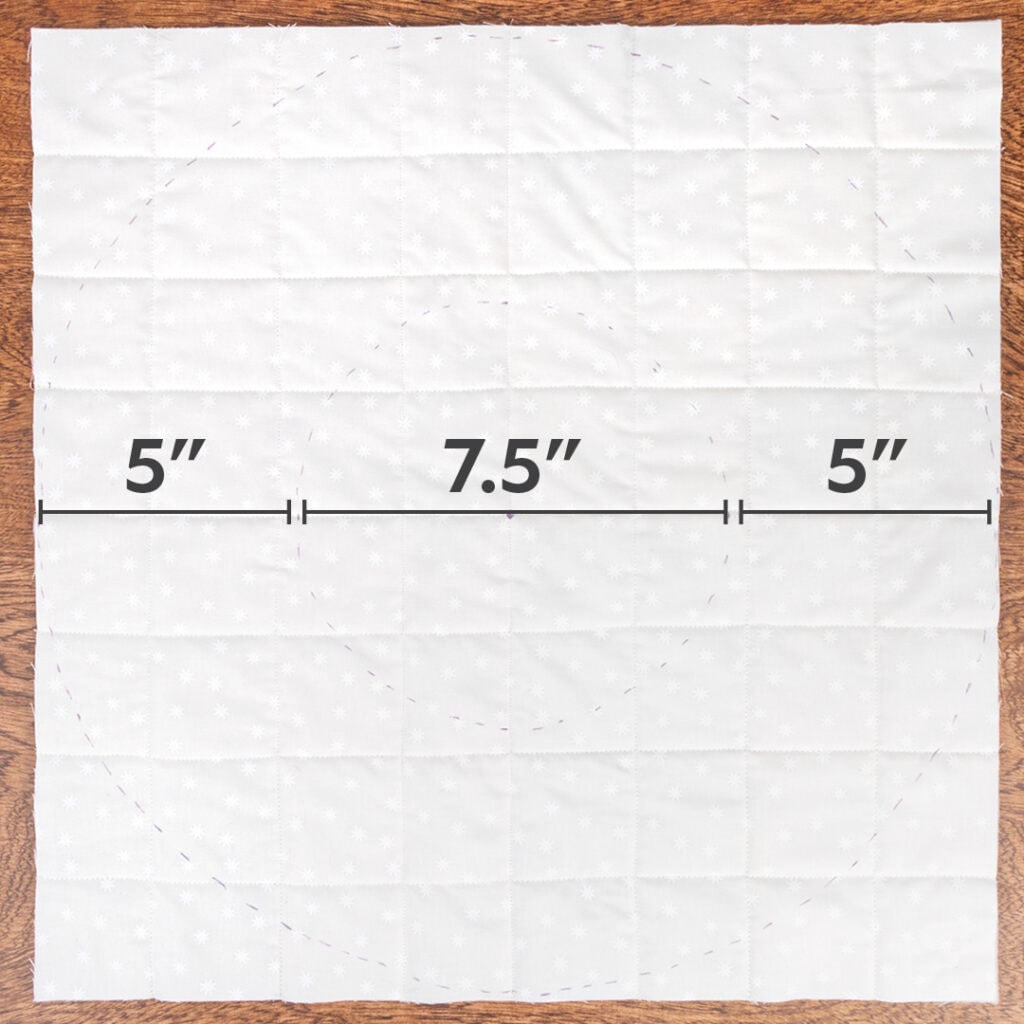
For the adult-sized Scrappy Witch’s Hat, you will make two blocks, piecing four rows of four Charm Squares (5″x 5″) for blocks that finish at 18″ x 18″ each.
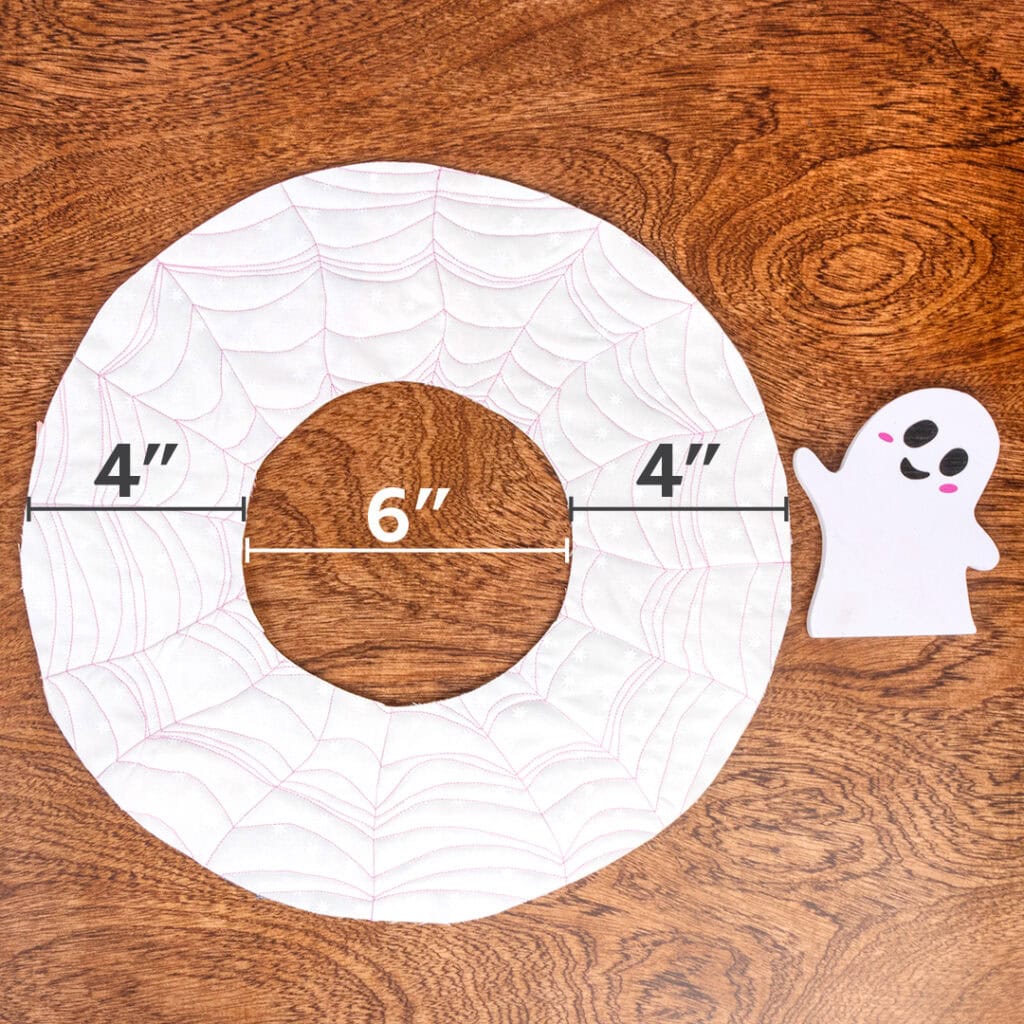
For the child-sized Scrappy Witch’s Hat, you will make two blocks, piecing seven rows of seven MINI Charm Squares (2.5″ x 2.5″) for blocks that finish at 14″ x 14″ each.
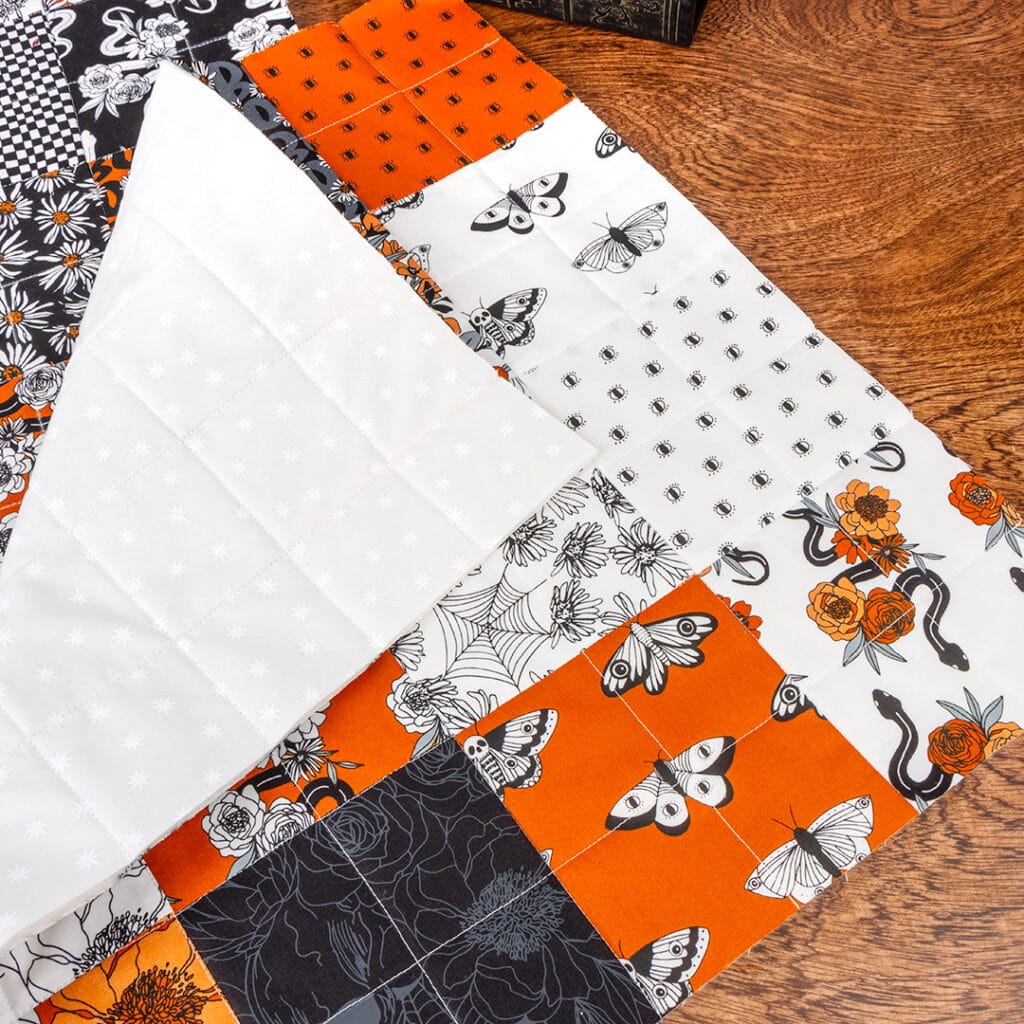

Cut your backing and batting to the same size as your pieced block, and assemble your quilt sandwich using your favorite quilting pattern. Let us know in the comments if you want to see a tutorial on our Instagram for this free-motion spider web quilting pattern!
3. Draw and Cut Out the Brim and Cone
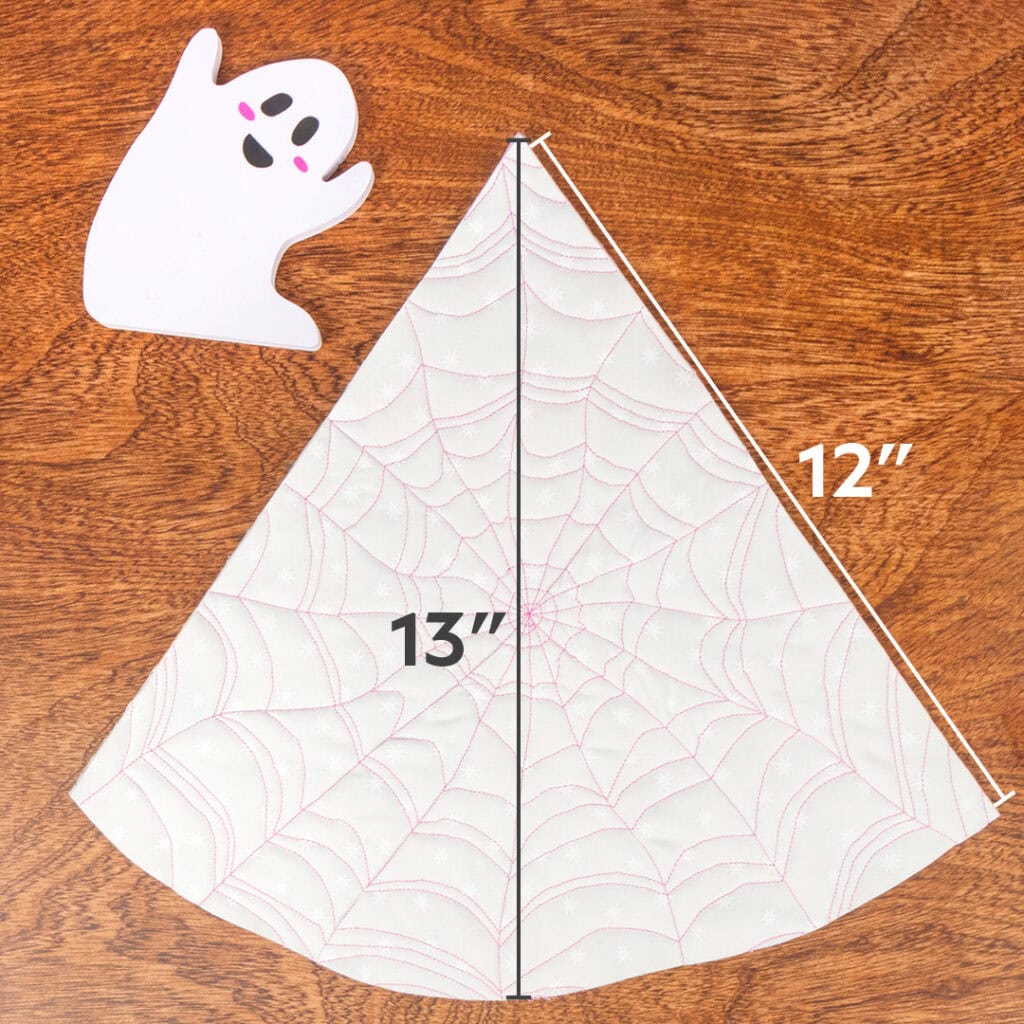
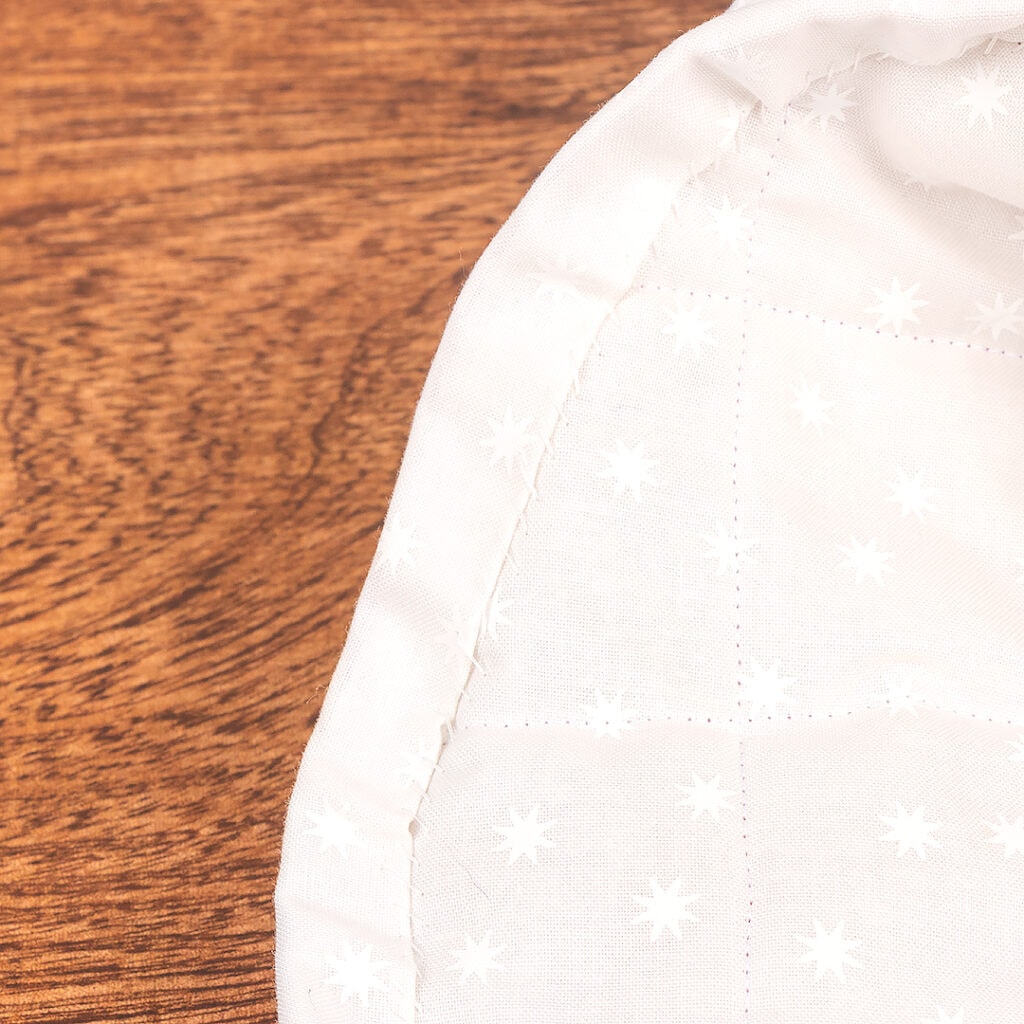
Long-time readers of the Jolly Jabber Blog know how much we love using Pilot Frixion Pens and we’re really loving the Frixion Fineliner Pens. On the backing side of your quilt sandwitches, draw the outline of the brim and cone of your hat. Use a soft ruler when drafting the brim of the hat to make sure the width is even the whole way around. Then, when you’re drawing the cone, mark the side and center lines and draw a sloping curve to connect them.
For the adult-sized Scrappy Witch’s Hat, follow these measurements:
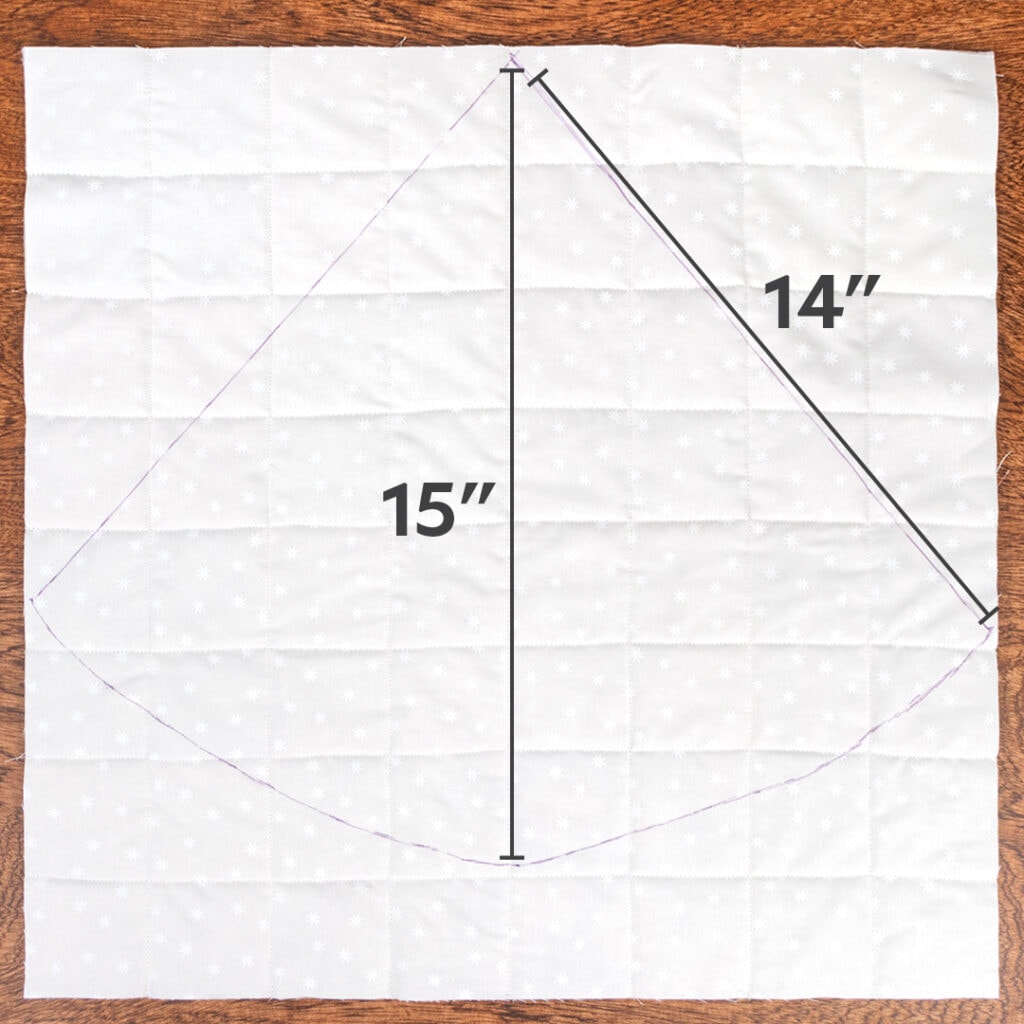
***Note: If you would like your hat to sit down, around the head instead of on top, like ours does here, make sure that the bottom curve of the crown is the same measurement as the circumference of your head! Use a soft measuring tape to measure the curve accurately. You will likely need to add an inch or two to the height of the crown (that 15″ measurement), to exaggerate the curve. As a result to widening the crown, the brim will sit flatter and gather less.
For the child-sized Scrappy Witch’s Hat, follow these measurements:
Once your outlines are complete, cut your pieces out with a pair of sharp sewing scissors.
***Note: The seam allowance is included in these measurements, so cut directly on your drawn lines!
4. Assemble The Hat
We told you that your hat would work up in a snap– we’re already assembling! When assembling your hat, we suggest using a slightly longer stitch length and swapping out your normal foot for a walking foot to help navigate the bulk.

- With right sides facing, sew the straight edges of the cone together with a half-inch seam allowance.
- Turn the cone right side out, using a large knitting needle, or something similar, to help turn the point.
- With right sides facing, ease the base of the cone into the center of the brim.
- Sewing Witch Tip: Start by pinning the center backs and center fronts, then pin the middle points between each of the previous pins. There will be more fabric on the brim than the crown, so take your time pinning and use as many pins as you need! We used about 32!
- With the brim facing down, sew the crown to the brim with a half-inch seam allowance.
- Sewing Witch Tip: By sewing with the piece that has more fabric on the bottom, and taking your time to evenly distribute the excess fabric by pinning, the feed dogs on your machine will essentially do the gathering for you!
5. Add the Binding to the Brim
The Scrappy Witch’s Hat can be finished with fabric binding or with ribbon. In our sewing room, we had some of the Stitching With The Housewives Black Ribbon on hand and it matched the Noir fabric so well that we had to include it for y’all in this tutorial. Black and white ribbons like the ones in this pack are the perfect finishing touch for a Scrappy Witch’s Hat because they will complement any spooky scraps in your stash!
If you want to finish your hat with fabric binding, you will need to cut two 2″ x WOF strips from the lining fabric and join them together. Keep the magical momentum going in the final steps of your project by using the Clover 2″ Bias Tape Maker!
For the fabric binding on the brim, we used the stitch-in-the-ditch method, but you could also attach the binding to the top of the brim by machine and hand-stitch the binding to the bottom for a more tidy finish.
For those with more confidence at the sewing machine, the ribbon can be attached to the brim with a combination of enough pins and patience. For the brim of our hat, we opted to hand-sew it all while watching our favorite Halloween movie!

6. Finish the Inside Seam With Binding
This final step is optional but highly recommended if you know 1) it is going into the hands of a spirited little witch or warlock or 2) you plan on bringing it back out year after year. Adding binding to the inner circumference of the hat adds extra strength to the seam and makes it a bit more comfy to wear.
To finish the inner seam of the hat, whip stitch the remaining binding on either side of the seam, making sure to only catch the bottom layer of fabric. If you prefer to do your sewing at the machine, you will want to add a decorative ribbon to the outside of the hat to cover your seam lines! Who doesn’t want an excuse to add something cute and save some time?!

When you’re finishing your inside seam, add a hair comb using some safety pins or a few stitches to provide more stability when rocking your new look! If you opted to add those few inches to your hat in step 3 to have the hat sit further down on the head, you can skip this step.
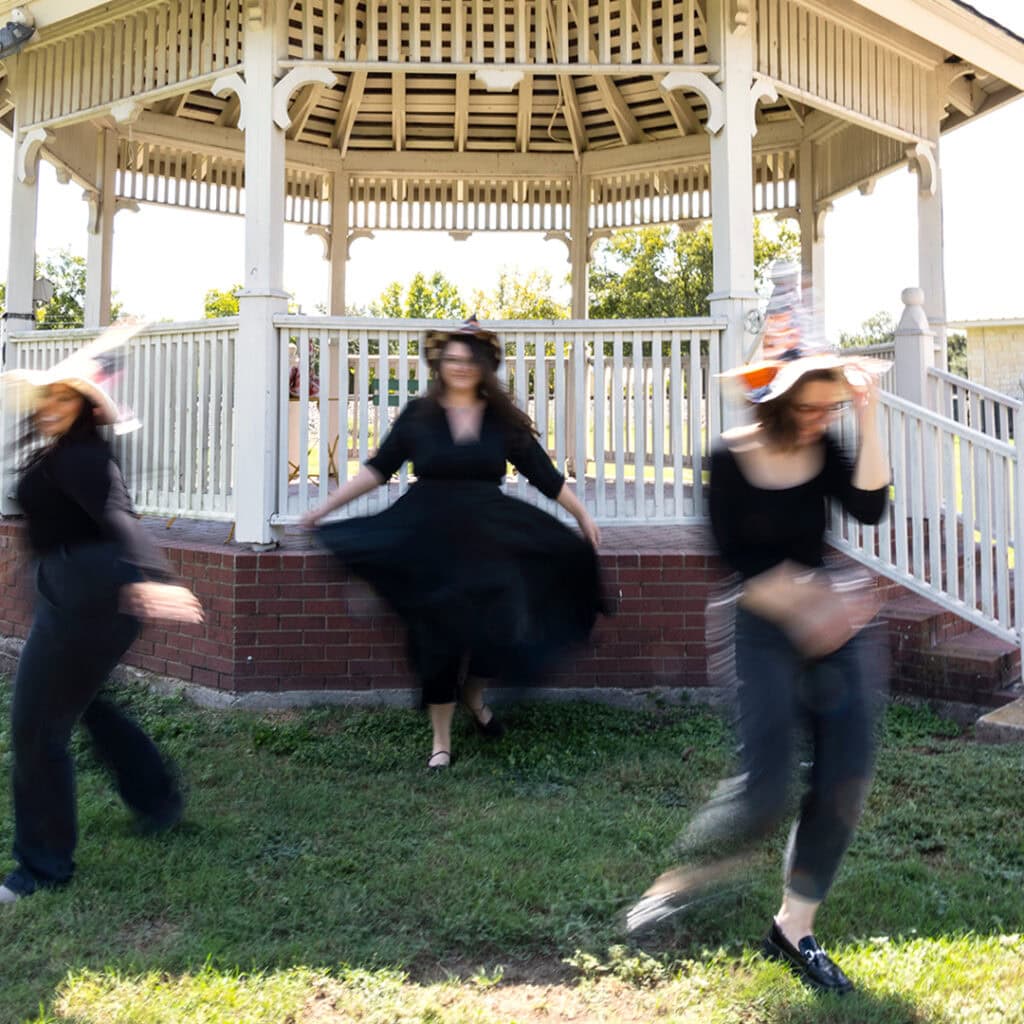
7. Go Spread The Magic!
We can’t wait to see your Scrappy Witch’s Hats out in the wild! Be sure to share your bewitching makes by using the hashtag #ScrappyWitchsHat and tagging us on Instagram.
Stay connected to Fat Quarter Shop!


41 comments
Thank you! Love this; I know a little Gryffindor fan who would love this hat!
Oh My goodness. Thank You Fat Quarter Shop for this spectacular pattern. This will be a fun fast afternoon sewing. 💞💞👏👏
Would love to see a video please.
Oh, wow! You made my day with this!I pieced scraps from a Spooky Box (the cat one a few years ago), but it didn’t work out for that. I’m going to see if I can use it while I wait for a charm pack or two to arrive!
Love these sew much! 🩷
This needs to be a downloadable pattern! How absolutely adorable!
Would love to know how to free quilt the spider web design.
This is so cute, I love the idea of a hat that is different from the black we see all the time.
Love this idea, but I’m a visual person so these instructions have me a little confused. Would love this as a tutorial on YouTube or instagram.
Too adorable! Would love to see a tutorial on how to free motion quilt the spider web design. Thanks for sharing.
Made the adult hat and it fits a child (kind of sad because of that). Wish I looked at the comments beforehand…
Hello Elaine! We have since updated steps one and three in the tutorial to be more clear about the intended fit of the hat and we even added some tips for adjusting the measurements to be the perfect size for you! I hope a little witch or wizard in your life enjoys the hat you made first and I look forward to hearing how these updates help.
Love LOVE! LOVE !!! THIS. thank you!
Love seeing this pattern and hope to see more similar like this. Thank you. I am wondering how to make such an exact brim without a paper pattern?
Loved the pattern so I spent all day constructing, went to put it on after sewing the brim and it is too small for my head. Made the adult size. Going to have to find a child to give it to.
Hello Debra! We have since updated steps one and three in the tutorial to be more clear about the intended fit of the hat and we even added some tips for adjusting the measurements to be the perfect size for you! I hope a little witch or wizard in your life enjoys the hat you made first and I look forward to hearing how these updates help on your next one!
Hello Cazus! The answer is a TON of measuring. If you click on the image of the brim in step three, you will see tons of little tick marks on the fabric. The trick is to start with the inner circle, measuring from the exact center, and then drawing the outer circle from there.
J’adore ce chapeau! Merci pour le partage .😍👏🧡🖤💜
Same thing happened to me. I’m making another one today with a bigger cone (hopefully)
Such a cute pattern.
I hope your second hat has the fit you wanted! We’ve just updated the tutorial in steps 1 and 3 to better explain that the hat is meant to rest on top of the head and how to adjust the measurements to have it sit on the head. Thank you for brining up the confusion! It always helps us make our tutorials better!
Well that’s sooooo spooooky & adorable! Yes a video would be helpful. I usually slow down the replays so if it’s a faster one it’s ok. Thanks FQS y’all are always sooo spooooky & wonderful. Never disappointing. 👻
Would love to see spiderweb quilt design.
Thank you. This is a fun project. Yes, I would love to see the spider web quilting design tutorial. Actually a tutorial for making this hat would be awesome too. Again, thank you!!
So cute! I’d like to see a tutorial.
Would love to know how to quilt with the spider web pattern!!
Is the child size meant for a baby? I don’t see how a 14” square could make a cone for a child’s hat especially when instructions say to use 1/2” seam allowance.
Hello Mary! Sorry about the confusion, we’ve updated the tutorial in steps 1 and 3 to give more info about the fit of the hat and how to adjust the measurements if you want a different fit. I hope these updates help!
Would love to see a tutorial for the free motion spider web quilting, please!
Yes please! I would love to see a tutorial for the free motion quilting spider web.
Made the adult size and so sad — it’s incredibly small. Might fit a child. Cute but I wanted to wear it.
Hello T! We have since updated steps one and three in the tutorial to be more clear about the intended fit of the hat and we even added some tips for adjusting the measurements to be the perfect size for you! I hope a little witch or wizard in your life enjoys the hat you made first and I look forward to hearing how these updates help.
The large hat was way too small and would not fit my head. It’s adorable though, so I put it on a pumpkin
Hello Kris! I bet you have the cutest pumpkin in town, now! We have since updated steps one and three in the tutorial to be more clear about the intended fit of the hat and we even added some tips for adjusting the measurements to be the perfect size for you if you decide to make another one for yourself!
This is an adorable pattern! Two suggestions, though: the sizing didn’t work for me. I made the adult-size hat for my teenager and it was 3 inches too small for him. It didn’t even fit my 7-year-old. Could you add different size hats with head circumferences for size selection? Also, a printable pattern for the two hat pieces would be extremely helpful (those curves took a lot of measuring to work out). Thank you for the really fun pattern and I’m off to re-make our hat into a larger size.
Hello Jessica! I’m glad to hear that you love the tutorial! After comments from y’all, we have updated the tutorial in steps 1 and 3 to give a better idea for the intended fit of the hat and how to adjust the measurements to get your perfect fit. I hope you have fun making your next one!
This pattern’s measurements did not fit an adult head. I had to readjust the measurements to fit. A video would have been helpful. This is a super cute pattern, however disappointed in the fact that the measurements were not correct for the adult hat.
Hello Lori! I’m glad to hear that you were able to make the adjustments you needed to make the hat the perfect fit for you! We have since updated steps one and three in the tutorial to be more clear about the intended fit of the hat and we even added some tips for adjusting the measurements. Thanks for bringing up this confusion so we could fix it!
I made the cone 15” tall and 23” wide (5 blocks) at the widest point. It fit the brim opening perfectly and fits my head. I compared the pattern to a store-bought witches hat.
Thanks for the cute project.
Hello MG! I’m glad to hear that you loved the project and were able to adjust it for your perfect fit!
I love this pattern! I’m gonna make this but I’m a little co fused on which batting you recommend so it will “stand up”. Can you recommend which one? Please and thank you in advance!
This is sooo adorable